Official development blog
[ Latest Cogmind Release Notes: Feb 2026, "Unchained More" ]

Scanalyzers & Fabricators

Aside from the terminals described in the previous post, other machines have more specific functions and therefore a narrower range of options when using them. Below are two more such interactive machines.

Scanalyzers

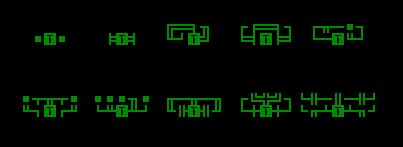
cogmind_interactive_scanalyzers“Scanalyzers” can produce a schematic for a specific part you provide.

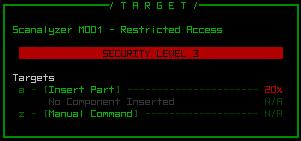
cogmind_scanalyzer_targets

An initial connection to a scanalyzer will essentially always look like this, since there isn’t anything else it can do.

The first thing you have to do is get it to accept the part for scanning--a separate window will open listing all available and applicable inventory items. After inserting the part you hack to initiate the scan, which produces a schematic if you succeed. The good thing is scanning is effectively instantaneous; the bad thing is a failed hack will cause the scanalyzer to eat the part.

Higher level scanalyzers are required to scan prototypes and more advanced parts, and scanalyzers will reject broken or faulty parts.

As for what schematics do, that’s where fabricators come in.

Fabricators

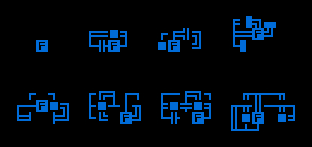
cogmind_interactive_fabricatorsFabricators build parts and even robots according to schematics obtained by scanning a part at a scanalyzer, hacking into a schematic database through a terminal, and possibly through other means.

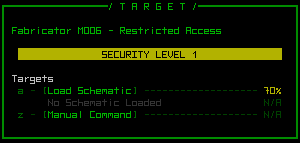
cogmind_fabricator_targets

The basic fabricator interface.

Although fabricators are self-powered, they do not have their own source of matter. Before fabrication can begin you must provide the necessary matter in the form of matter containers. This is good because I don’t think matter containers were useful enough in the 7DRL version. They’re not too difficult to find since unarmed worker bots carry them, but you’ll need to fill them with matter, which is now possible via a new feature.

In the 7DRL prototype matter containers only served to increase your own matter storage capacity, but didn’t actually retain the matter themselves when removed. Now you can toggle the state of an attached container to set it to LOAD itself from your stores when detached. This feature works for energy containers (like batteries), too, and is an option rather than default behavior because you may be low on resources and want to retain them rather than store them away in your inventory.

cogmind_container_load

This matter storage unit will take up to 50 matter from your stores when detached. It will return that amount to your stores when reattached, or can be fed to a fabricator to build something.

When fabrication begins surplus matter will be returned to your storage, or put on the ground if you have no room. Empty matter containers will later be returned once the fabrication is complete.

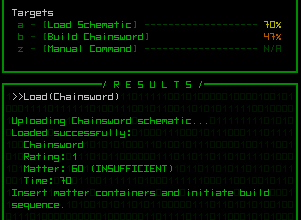
cogmind_fabricator_loaded

Once a schematic is successfully uploaded, the system will indicate the required resources and await further instructions.

As you can see fabrication also takes time, another risk of building your own stuff since hanging around in the same area for too long can be dangerous.

Higher level fabricators are required to construct prototypes and more advanced parts and robots. They also require more matter and time.

Posted in Mechanics | Tagged , , , , , | Leave a comment

Terminals

cogmind_interactive_terminalsTerminals are the most versatile interactive machine you’ll encounter. Their primary feature is the ability to provide useful information. Of course that information usually doesn’t come without risks, and you’ll be hacking to get it as described in the previous post.

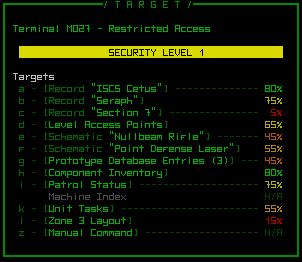
cogmind_terminal_targets

Sampling of targets for hacking at a mockup terminal.

Information

None of the information available through terminals is absolutely essential to the game, so you can safely ignore them if you can’t be bothered, but they generally offer ways to make your journey all that much more survivable by giving you some kind of strategic advantage.

Here are some of the common data targets (the list is still being expanded):

  • Level access locations, indicating where you can transfer to a new area
  • Schematics for parts and robots (read about using schematics in the next post)
  • Robot analysis highlighting the weaknesses of each class
  • Prototype ID information for identifying prototypes without experimentation
  • Part stockpile locations
  • Map data
  • Machine location data
  • Patrol information and their instructions/goals if engaged in a search

Story

Story details and fluff will be available as hackable “data records.” As you progress you’ll gradually piece together the story by both finding records through different terminals, as well as indirectly hacking through a “chain” of connected records by accessing highlighted keywords.

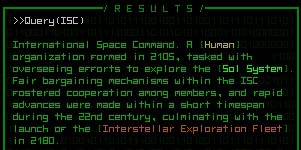
cogmind_terminal_record

Keywords leading to other records are highlighted in the entry itself and become clickable buttons colored based on their difficulty. (If you are playing without a mouse, you can still access these through manual hacking.)

Control

Aside from providing information, terminals will also offer some amount of control such as opening sealed doors, disrupting communications, redirecting/recalling patrols, etc. This hasn’t been worked into the game yet, and these and more functions will be added later as necessary when the world mechanics are under development. In any case a complete framework already exists so adding these features will be fairly simple when the time comes.

Posted in Mechanics | Tagged , , , , | Leave a comment

Hacking, the Interface

As previously mentioned, there is no hacking “mini-game.” We don’t want to interrupt the flow of a game that can otherwise be quick to play (if that’s your style). Thus the process of hacking emphasizes a very quick “in and out fast” approach.

Hacking Process

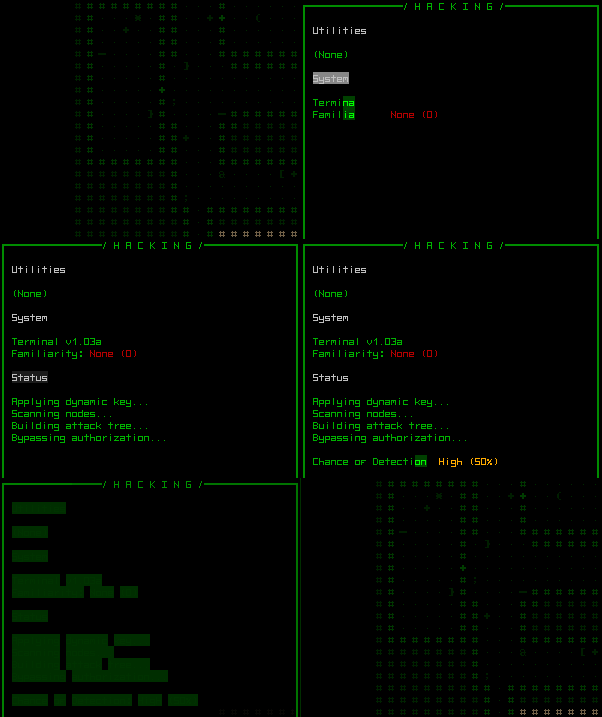
Hacking a machine is a pretty straightforward process. Bump into it to start the hacking process, which opens several consoles as shown in the previous post’s mockup image. The first one provides information updates about the overall situation/status:
cogmind_hacking_status

Basic hacking status info on connecting to a terminal.

The status lists any equipped hacking-related utilities that may contribute in some way, followed by the type of system and your familiarity with it.

Familiarity with the given system is the game’s first (and probably only) improvable “skill.” For each type of machine there is you gain familiarity each time you hack a new machine connected to that system. The extra proficiency will help hack into systems of the same type protected by higher security levels. Familiarity only provides a modest modifier, however, with better bonuses coming from equipped hacking-related utilities (more on those later).

Finally, the status window ends with the current chance of detection when hacking a target through that machine (more on detection later, too).

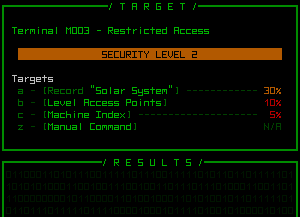
After displaying the status, two more consoles pop up: A known targets list and the command shell.
cogmind_hacking_targets

Some hacking targets used for testing, under which is the result area--empty until a command is entered.

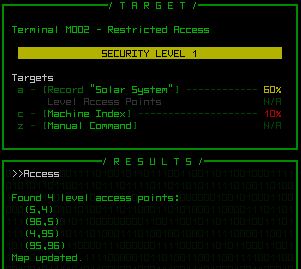
The initial scan of a machine shows its ID# and security level, followed by a list of all discovered system targets hackable through that machine. Higher security is more likely to protect more important data, but is correspondingly more difficult to hack. The chance of success is always given as a percent that takes into account all factors, allowing you to weigh the rewards (which are generally clearly indicated) against the potential risks.
cogmind_hacking_results

Success! Now we know where the exits are.

Clicking on a target (or keying in its corresponding letter) will enter that command, which appears in the result window along with--surprise--the results.

Whether successful or not, each time you attempt to hack a target you also roll against the current chance of detection shown in the status window. Failed hacks increase the chance of detection for the current and all subsequent hacks at that machine.

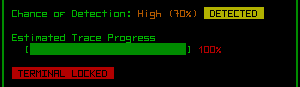
Once detected, you can still continue to hack targets, but from that point on you are being traced, and as soon as the trace reaches 100% the machine will be locked down permanently, along with other drawbacks (see the “risks” section further down).
cogmind_machine_lockout

Well, I think we’re done here.

You’ll never be detected immediately on connection, unless you’ve accessed and hacked the same machine before, so you’ll always get at least one chance to hack a new machine before anything starts to happen (or decide that you don’t want to mess with that particular machine).

You also have the choice to disconnect and start over later, but subsequent unauthorized connections to the same machine are more likely to be discovered, not to mention the chance of immediate detection on re-connection.

Manual Hacking

Every hacking command can be entered manually if you know the syntax, even when it’s not listed as a target. This is considered “indirect hacking,” or attempting to access a part of the system further away.

Hacking indirect targets is more difficult, but can occasionally be useful for getting information you really want, picking up where you left off when hacking bits of the story, or entering “secret commands” obtained via NPCs.
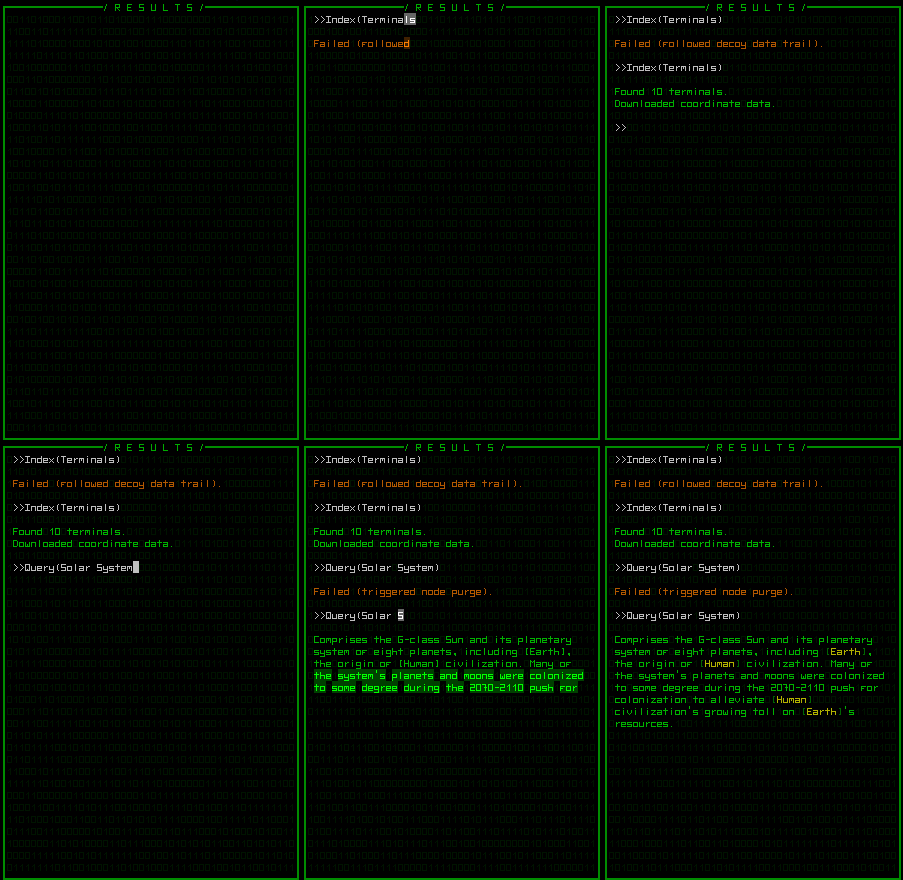
cogmind_manual_hack

Manual hacking. Like a normal terminal, previous commands are stored in a buffer so they can be easily recalled and modified if necessary.

Manual hacking is really only meaningful for terminals, which can access a large variety of data unlike other types of machines, which are hacked mostly to operate rather than use as gates to information.

Risks

While hacking is not a mini-game in the traditional sense, there is a bit of meta-decision making beyond simply what you want access to, since being traced has one or more drawbacks.

The obvious one is that you’ll be locked out of that machine permanently. Aside from lockout, there is a chance of “feedback” whereby you’re attacked through the system itself, causing corruption and/or possibly frying one of your active hacking utilities. More certain is that after tracing your location one or more robots will be dispatched to investigate the source, and patrols in the area might also be increased.

Another category of negative effects I’m still undecided on are those that make it “seem” like you succeeded in a hack, but actually failed and the negative results will only become apparent later, like incorrect information, or a repaired part that later malfunctions and/or sabotages you, or even a fabricator-constructed ally that later defects to the other side in the heat of battle. While they could be fun, these could also end up just being really annoying and make hacking seem to too dangerous or unreliable for the player since they’d essentially be unavoidable (adding a part that detects/avoids this doesn’t prevent it from being an annoying mechanic).

Hacking carries no risks until you are traced, so when to quit is up to you (it will take a little experience to figure that out, but at low-security machines it won’t happen too fast).

Utilities

There are six categories of hacking utilities, none of which are required, but when present and active will each assist with a different aspect of the hacking process.

  • Analysis: Increases the rate of familiarity improvement
  • Stealth: Reduces chance of detection
  • Attack Strength: Increases chance of hacking success
  • Tunneling: Bonus to indirect hacks
  • Evasion: Reduces amount by which failed hacks increase chance of detection and (if already detected) tracing progress
  • Defense: Protect against feedback


Later posts will cover each of the current machine types, and discuss their respective functions.

Update 161119: Nearly three years after this original post, I’ve done a summary of improvements to the hacking UI experience as Cogmind approaches completion.

Posted in GUI, Mechanics | Tagged , , , , | 3 Responses

Hacking, the Concept

hack /hak/ v. Gain unauthorized access to a system.

For the past several weeks development has mostly focused on what can be considered the “other half” of the game. Aside from exploring the map, fighting robots, and re-building yourself, an entirely new component unseen in the 7DRL prototype is now being integrated into the game: Hacking. (I briefly touched upon hacking earlier with the introduction of machines.)

This is both wonderful and scary at the same time. Wonderful because there will be a whole range of new ways to interact with the world, and scary because it can be a pretty major part of the game but was never prototyped!

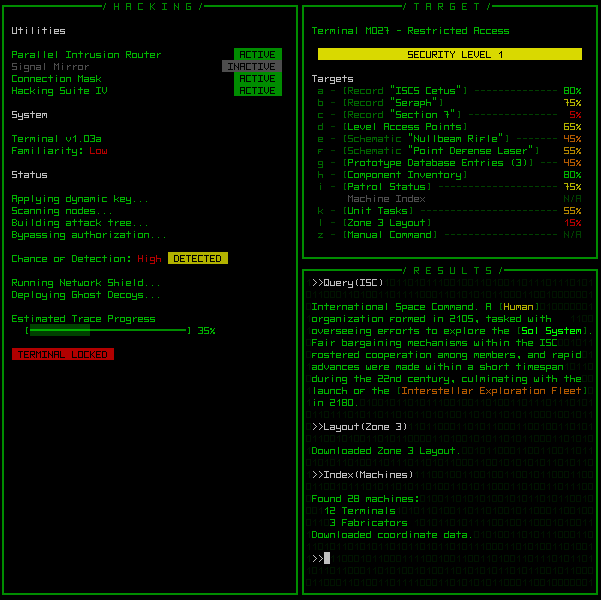
This is a mockup of the hacking interface as it could appear over the map:

cogmind_hacking_mockup

Left: First console to appear, showing general information and the progress of the hack. Top-right: List of known targets to hack from the current machine. Bottom-right: Commands entered and their results.

So where does hacking fit into the game?

Firstly, most of the story is presented through data files accessible at terminals, essentially making it optional for those who care to know what the heck is going on (trust me, when you find the cave systems, or stumble across hidden research labs, you’ll want to know at least a little of what’s going on).

From a gameplay perspective, hacking opens up more strategic options through the various functions machines are capable of. Everything they can do is closely integrated with other parts of the game. In general machines enable you to gather information, manipulate the environment, and provide tools to augment your capabilities.

You can do as much, or as little, hacking as you want depending on your needs and style. Following posts will explore the interface and mechanics in more detail. (I’ve tried to keep the system simple, but it turns out there really is still a lot of detail in there…)

Posted in Design | Tagged , , | 4 Responses

Burnout, Momentum & EM Disruption

A set of new unrelated mechanics was recently added to provide more strategic options. I’ll summarize them together here.

Propulsion Overloading

Similar to overloadable energy weapons, some hover and flight modules will now support overloading as well. As a completely optional mode toggled through the normal activate/deactivate cycle, while overloaded a propulsion system factors into the speed calculation as if a second one of the same type was attached.

cogmind_propulsion_overload

Cycling through inactive, active, and overloaded state.

At the same time this will drain more energy and produce more heat, so much so that it’s unlikely a build will be able to sustain overload speeds for long. Still, it could be useful for a quick escape, or to achieve seriously deadly ramming speeds (probably overkill…); it’s also a good way to get extra speed when low on only propulsion components and the extra energy requirement might not be as limiting.

Seeing as overloading forces a part to output beyond what it was designed to regularly handle, over the long term the additional strain will cause it to gradually lose integrity dependent on its “burnout rate.” So overloading is more than just a tradeoff of energy/heat for speed, as it could eventually render your propulsion useless (though this is not something that could happen suddenly). Unlike weapon overload mechanics there is no chance of negative effects on other attached parts.

Momentum

Ramming was added earlier as a potential attack when no other weapons are available, but the initial implementation based damage purely on a straightforward static value. To make the system a bit more dynamic, moving robots now keep a tally of their number of consecutive moves in the same direction and on impact calculate damage based on that value along with total mass and speed. This adds a bit of realism, and while not as simple to calculate as a static value, it’s a lot more fun doing extra damage when you are going really, really fast or carrying a lot of mass. Effective momentum is increased even further if the target is moving directly towards you in the opposite direction.

Melee weapons also gain damage bonuses based on momentum at the time of attack, so rapidly charging a target while slicing into it with your electro-blade will have even more desirable effects :) If flying, you may want to turn on those afterburners (via propulsion overloading) shortly before spearing a target with your alloy lance!

EM Disruption

Disruption is a new property that some electromagnetic weapons may take advantage of, creating a smaller sub-category of EM weapons with a special purpose. By design they will generally cause less damage to a target (and therefore less corruption, the primary side-effect of EM attacks), instead relying mostly on a chance to temporarily disable whatever part they hit, or even a core.

A disabled core means that a robot is essentially shut down for the duration. Shutdowns weren’t possible before so this is a newly implemented feature that could possibly be used in other interesting ways in the future.

cogmind_EMP_disruption

Using a powerful EMP blast to disrupt a group of swarmers. Two are shut down, and a third starts to retreat around the corner because its assault rifle was disabled.

For now Cogmind is going to be immune to the effect of disruption, as it would most likely be incredibly annoying and have too great a random negative impact on a build. (EM-caused corruption on the other hand will continue to be an important danger, especially in the late game.)

Component Deterioration

One common roguelike staple is noticeably missing from the game: consumable items. Though considered in the original design, in most cases potion/scroll/etc. equivalents turned out to be illogical and/or non-essential for interesting gameplay, and even less a requirement since all your equipment is destroyable anyway, giving it a somewhat “consumable” element since you’ll be changing out parts fairly frequently.

There is, however, still one role of consumable items that could make for more interesting options, that of very powerful limited-use items. These are already possible to an extent by applying huge energy or matter requirements to usage of a part, but this method doesn’t effectively extend to all part types; besides, it would be nice to have some powerful disposable weapons or utilities that don’t require much in the way of resources but fall apart fairly quickly.

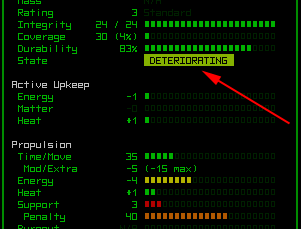
The new “deterioration” property will not appear on just any part--it applies to specific parts so if you ever see that part type you’ll know it’s a design that deteriorates with use. These parts won’t deteriorate while inactive or stored in inventory, but while active they lose integrity at a part-dependent rate. Once their integrity falls to 1, the part is permanently disabled. (Credit: The concept of deterioration was suggested by Lap on Bay 12, so thanks for that!)

cogmind_part_deterioration

If you see this state on a part, be sure to activate it only when absolutely necessary.

Posted in Mechanics | Tagged , | 4 Responses