Last time we looked at what happens when you use the Unlock hack on a Garrison Access machine. Now about that rabbit hole…
SPOILER WARNING: This post is going to be absolutely full of spoilers. There are so many details to the implementation of this feature that tip-toeing around them would be annoying and not much of a discussion, plus they’re interesting to look at for design purposes. So I’m going to go all out and discuss them here.
Technically there is information provided herein that (as of Alpha 4) might take a while to figure out, or even require dumb luck and close observation to learn. This will change later, because all garrison secrets will be revealed via in-game lore, but most of that lore comes in a later section not yet added.
Clearly presenting this information here in advance does help you get the most out of garrisons, though, so if you don’t mind being spoon fed mechanics and “secrets,” then by all means read on! (I will avoid a few details that aren’t required for a thorough overview.)
So what is on the other side of that entrance? Yes, it’s exactly what you might expect--an area in which the enemy garrisons its forces. You’d have to be crazy to want to go there, right? Well, that depends on what you’re out to do…
Garrisons and the World
First of all, I consider garrisons to be “maps between maps,” which is a better angle from which to understand their design. They can also appear at any depth, further distinguishing them from all other map types.
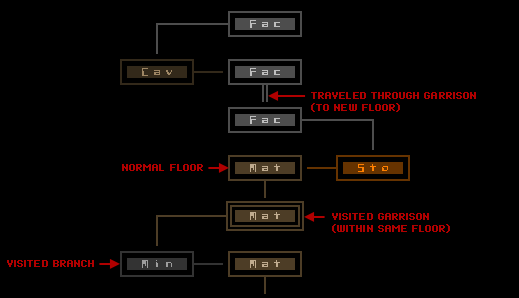
When you pass through a garrison, it will either connect you back to another section of the same floor at the same depth that you came from, or to one of any other maps/areas that were originally connected from your map of origin. To demonstrate, see this modified subset of our hypothetical world map:
You can’t know in advance whether a garrison will take you to a new map or depth, so that’s not likely to be a primary purpose behind choosing to enter a garrison. (More on that later.)
Garrisons as their own map were not in the original design doc, but as soon as I added the Garrison Access for Alpha 4 it seemed like a logical extension which addresses the whole “why can’t I go in there if I want to?” issue. Why create a glaring artificial roadblock to exploration where there are opportunities to present the player with interesting options?
Garrisons also conveniently coincide with another idea that did appear in the design doc for probable implementation, but still hadn’t been added at this point: “Conduits.” The idea behind those was that you could seek out well-hidden protected exits that would take you to further away maps, even up multiple depths. Having garrisons doesn’t exclude the possibility of conduits, but the two are very similar in nature, and garrisons honestly do a much better job fitting into the structure of the world by being tightly connected to several of its other mechanics.
Map Layout
As a unique type of map in which I wanted much greater control over certain aspects of the experience, for garrisons I decided against using any of the existing map generators, instead opting for a completely prefab-based approach.
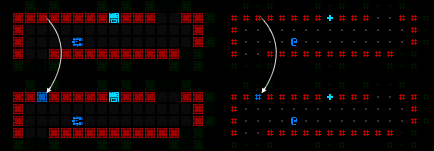
The map area is divided into quarters, each one randomly choosing a prefab map piece and rotating it as necessary to fit that quarter. I’ve discussed how I create prefabs before, but here’s an example of one of the more simple quarter layouts used in actual garrisons:
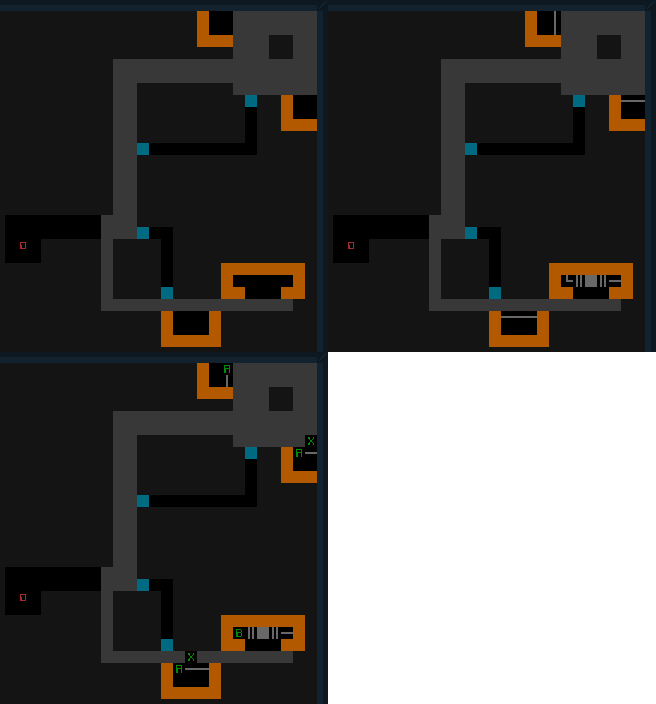
One of the simplest garrison quarter prefab layouts, showing also the machine layer and script reference layer.
With a large enough pool of prefabs, combined with rotation, there is plenty enough randomness to prevent the overall map from becoming repetitive or predictable, aside from the parts that I want to be fairly predictable. While there is a lot of room for variation, each quarter generally holds true to a set of rules self-imposed while designing the individual prefabs themselves:
Some of the more basic rules:
- Each quarter contains a primary “arm” connecting a larger central hub to outlying access points (the ‘0’), one per quarter.
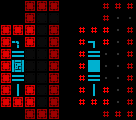
- The widest corridors almost always connect the hub directly to the access point, making them quite easy to find. Navigating a garrison is therefore no problem unless you leave the main path, in which case it’s obvious that’s what you’re doing, and even then it’s not easy to get lost because paths will more often than not be dead ends. Those blue marks in the prefab are impassable phase walls, a new mechanic discussed further below.
- Most quarters contain one Garrison Relay, generally guarded by a checkpoint. Also more on these below.
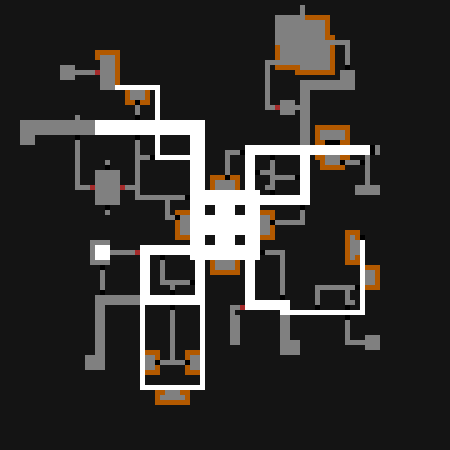
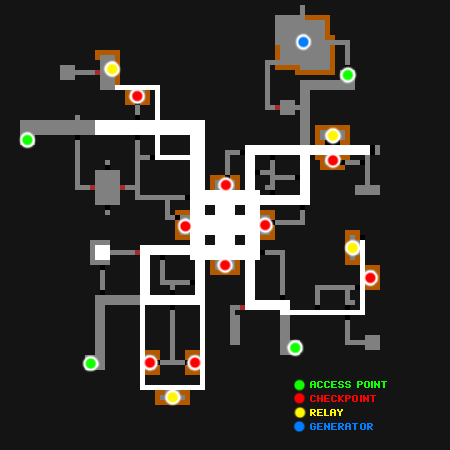
The final result when you combine a selection of different quarters can look like this:
Certainly we could code an algorithm capable of producing a truly limitless variety of garrisons. Having a list of rules and some mockups is a good first step in that process, and a couple times I did briefly consider doing just that. However, it would’ve been a lot more work, when creating dozens of prefabs gets the job done quite well in a fairly short amount of time (it took about a day to create several dozen variations).
Taking the non-fully-procedural route also has the advantage of being able to more closely control the difficulty, matching potential rewards with corresponding challenges within a single quarter, and influencing map composition overall by adjusting the weighted chance of using each quarter type. The more interesting and/or rewarding quarters are naturally more rare.
Some players will eventually learn to recognize some areas, one of the drawbacks of relying on a limited number of prefabs, but that’s the price paid for control. It’s not a heavy price, however, since even within a given static prefab there are variables that influence how the map plays out:
- Part caches with variable contents.
- Checkpoints. These run parallel to corridor sections, and are automatically detected by the game then populated based on a weighted algorithm. Every move in close proximity to a checkpoint has a chance to be detected and trigger the door, releasing whatever guards contained within. You may see or remember a checkpoint location, but you can never be sure what’s behind the door (no, not even with sensors :P).
- And of course the biggest variable of all--Cogmind! What the player is equipped with and capable of adds a new realm of possibilities.
On the map-wide scale, the composition of randomly placed active patrols will also cause the same base layout to play differently.
There is also some thematic logic to having garrisons share similar layouts, which is part of the reason for using a more controlled map generation system in the first place. And from the player’s point of view, it’s obvious both from a visual and tactical perspective that you’re in a place very different from the other maps--and not just because of the red walls ;).
Much of the garrison content is found in areas off the main paths, either hidden or in the open. These optional routes usually contain some sort of reward or benefit for overcoming whatever challenges they might contain. If not well-prepared, an excursion into these areas could very well attract more attention than you can handle--it is a garrison, after all! But I don’t imagine anyone would dare enter a garrison unprepared, right? :)
Inhabitants
Garrisons are the first part of the game in which you will see no non-combat robots! That means… no Recyclers! Also no bots to fix up the walls and clear out debris. Yep, the battlefield will remain just as pockmarked and littered with scrap as your strategy demands.
Garrisons are home solely to combat robots; quite a few of them, in fact. You’ll find they’re not always active, however. In addition to the checkpoints and patrols mentioned earlier, you may also come across robots in other states:
- DORMANT: Robots temporarily resting in this mode are only a problem if they wake up, which may be triggered by alarm traps, being alerted by their nearby allies, or by hostiles hanging around in their field of vision.
- UNPOWERED: Unpowered robots will never become active. There aren’t a whole lot of these--in terms of design they exist as fluff. (Though yeah they’re very much real and you can harvest them for parts if you’d like.)
- DISABLED: Some robots have been temporarily disabled and put in garrison storage. Prime candidates for rewiring!
Phase Walls
Hidden doors in Cogmind have always served a very specific purpose: Give hostiles additional routes via which to reach targets more quickly, or ambush them :). Interestingly, players’ first “natural roguelike reaction” to “secret doors” is to assume these lead to good loot. Not true (though yes you can benefit--in other ways--from knowing where they are and using them).
That said, we now have a new type of hidden door, and these do sometimes lead to Good Loot. (Warning: They also sometimes lead to Mad Robots :P)
This new mechanic was developed early on during the garrison design process because it makes a lot of sense that the robots would use similar ambush tactics here, but our original hidden door design is insufficient. In case you haven’t played, a recap: While only combat robots normally use hidden doors, they open for any robot, even you, when simply moving past. This works fine the way that hidden doors are normally used in Complex 0b10--placed in back or side walls of rooms--since you’re unlikely to find them by accident (though it does happen). By comparison, most of your time in garrisons is spent in narrow corridors (there are almost no rooms at all), and if we connect regular hidden doors to corridors for use in ambushes or to hide important things, they’re not going to be so hidden because you’re quite likely to pass right by them!
Here they use a new type of technology: Phase Walls.
You cannot differentiate phase walls from normal walls, even with a Structural Scanner, and they will not open for you. In effect they’re walls that only hostiles can pass through.
Your inability to use phase walls adds to the difficulty of garrisons, since the enemy can often take advantage of multiple looping routes, while you and your allies are trapped in the relatively limited scope of the main corridors. Of course, if you’re packing explosives, all bets are off--you can blow away phase walls just the same :D.
(There is one other cool mechanic regarding a special use for phase walls, but that will remain a secret for now unless you can figure it out.)
While there is no way to visually detect a phase wall without seeing it open, they make a unique sound when dematerializing and materializing, giving you a clue that something’s going on nearby. You can also hear through them just fine, even when closed. This is especially interesting when combined with the new machines…
Important Machines
Unlike most other maps, you won’t find any interactive machines in garrisons. Instead there is a pair of other machines which have roles to play in the mechanics of the area. As first mentioned in the previous post, it’s quite possible you’ll want to blow these up.
As objects meant to be destroyed, both of them use the cyan color first seen with Storage Shells and the special Sealed Heavy Doors you find later in the game.
Both also emit ambient sound, enabling you to locate them even when hidden behind phase walls, using volume levels to guess where such walls might be even when you have no other means to do so. (Note that eventually all machines in the game will emit sound, but I’m waiting until later to add those sound effects. In this case it was important to add for gameplay purposes.)
The more common of the two is the Garrison Relay. You’ll usually find about four of these things in each garrison.
Relays are responsible for transmitting orders to active robots, and also remotely protect those systems from hacking attempts. Take out a relay and you can expect to have a better chance to bend robot systems to your will. Take out more relays, and you could potentially have them all licking your robot boots. Doing this also makes them really mad (i.e. influences security level), but you get bonus points for doing it :)
This effect is strongest within the confines of the garrison itself, but it continues to take effect in the next map you visit, where relays from all linked garrisons are collectively responsible for squads (mechanically, you get half the bonus to robot hacking attempts). Travel further away from the disabled relay (two maps or more) and there is no more benefit.
Phase Generators are the other type of garrison-specific machine, though only about one of these is accessible per garrison.
These are responsible for those annoying phase walls. Take out a generator and all the walls come down with it. (Again, they won’t be too happy that you’ve done this.)
The Phase Generator doesn’t just turn to scrap metal, either. It’s actually one of my more spectacular explosions--very satisfying to see, and hear! Make sure there are enemies standing in the room for maximum MWUHAHA effect. Do try to get out of the way.
Destroying one of these things also puts a stop to their secondary use, a special effect I haven’t mentioned yet: sensor scrambling. On entering a garrison you’ll notice pretty quickly that your Sensor Arrays don’t work as expected. I added this mechanic because garrison ambushes are otherwise kinda pointless, and sensors also give away too much about the level layout and potential secret areas. Yes, you can still use Terrain Scanners, but they’re not quite as effective since they don’t reveal threats.
More interestingly, sensor scrambling only takes effect if there’s something in your detection radius, meaning you can continue to use your sensors to some extent and will know something is nearby, just not what or where, which can be scary =p. (Have you ever imagined a behemoth walking through a wall to open fire in your face? Just kidding, I’m not that mean. Or am I…)
Strategy
Being an entirely optional area accessible from almost anywhere in the game, it’s relatively easy to find your way into a garrison. But whether or not to do so is not that easy a decision to make.
First, for some background check out this labeled version of the layout shown earlier.
As you can see, there are four access points, one of which you’ll enter from and therefore cannot exit from, leaving three possible exits. All you absolutely must deal with are whatever random patrols there might be wandering around (not shown), and whatever is standing guard in the central hub checkpoints. (Note that if careful you can avoid simultaneously triggering multiple central checkpoints, and even avoid some entirely. I can’t imagine you’d want to trigger that many checkpoints unless… you’re carrying a nuke or something ;).)
About the exits, though, you may not be able to leave from the first one you find! Exits have a chance to be remotely locked when you try to use them, in an attempt to confine you to the garrison. Destroying relays increases the chances you’ll be able to make it out when you try, and if you’ve tried all but one exit, the last will always work.
In summary, here are some beneficial reasons to visit a garrison:
- Gain allies, possibly raise and maintain a little army of your own.
- Engage in robot hacking in the subsequent area.
- Impair defensive capabilities in the following area. Didn’t mention this one yet :D. Having created a distraction by mounting a direct attack on a garrison, the enemy will be forced to recall some combat robots, thereby shrinking the average squad size by 1. This only applies if you end up back on the same map you left, not when advancing to a new area, but it’s pretty significant!
- Obtain better parts, if you’re lucky…
- Have a chance to advance to another depth/area without searching for a normal exit in the main complex where floors might be sprawling and dangerous.
- No Programmer dispatches, though you’ll still have to deal with additional assault Carriers if you’re causing enough trouble.
- Earn bonus points for wreaking havoc.
And the top reasons to avoid garrisons:
- Possibly very dangerous unless well-prepared! Again, this is to be expected; you’re in a place where freaking everyone is packing guns, cannons, and other nasty things, quite extreme compared to most other areas of the world. It’s also not exactly a huge space. There’s less leeway for retreating and tactical positioning, limited sensor support, and a high probability of being ambushed.
- Instead of gradually going down over time like in other floors, your security level goes up for as long as you stay inside a garrison! (Every time you see the “ALERT: Garrison interior compromised” announcement, your influence just rose again.) Leaving a garrison also does not drop your influence rating as much as leaving other floors does.
- If you’re running a speed/stealth build, my guess is you’ll be heading into a death trap (I’m also guessing someone will attempt to prove me wrong here…). While maps are rather small and you might think you can fly your way past everything, one wrong or unlucky move and you could start feeling the pain. Did I mention there are quite a few stasis traps?
All said and done, garrisons are a flavorful addition to the world that come with a number of unique mechanics, benefits, and drawbacks. They’re your chance to take the battle to the enemy--think of it as you entering that building lobby in The Matrix :D
Next time we’ll be looking at unauthorized hacks, AKA the mischievous things you can now do with machines.
Update 220718: Garrisons have since been significantly expanded with embedded encounters, events, and other new features, covered in my article… Garrisons 2.0!
