As previously mentioned, there is no hacking “mini-game.” We don’t want to interrupt the flow of a game that can otherwise be quick to play (if that’s your style). Thus the process of hacking emphasizes a very quick “in and out fast” approach.
Hacking Process
Hacking a machine is a pretty straightforward process. Bump into it to start the hacking process, which opens several consoles as shown in the previous post’s mockup image. The first one provides information updates about the overall situation/status:
The status lists any equipped hacking-related utilities that may contribute in some way, followed by the type of system and your familiarity with it.
Familiarity with the given system is the game’s first (and probably only) improvable “skill.” For each type of machine there is you gain familiarity each time you hack a new machine connected to that system. The extra proficiency will help hack into systems of the same type protected by higher security levels. Familiarity only provides a modest modifier, however, with better bonuses coming from equipped hacking-related utilities (more on those later).
Finally, the status window ends with the current chance of detection when hacking a target through that machine (more on detection later, too).
After displaying the status, two more consoles pop up: A known targets list and the command shell.

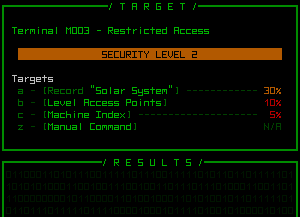
Some hacking targets used for testing, under which is the result area--empty until a command is entered.
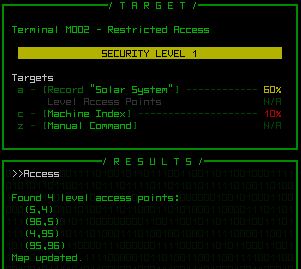
The initial scan of a machine shows its ID# and security level, followed by a list of all discovered system targets hackable through that machine. Higher security is more likely to protect more important data, but is correspondingly more difficult to hack. The chance of success is always given as a percent that takes into account all factors, allowing you to weigh the rewards (which are generally clearly indicated) against the potential risks.
Clicking on a target (or keying in its corresponding letter) will enter that command, which appears in the result window along with--surprise--the results.
Whether successful or not, each time you attempt to hack a target you also roll against the current chance of detection shown in the status window. Failed hacks increase the chance of detection for the current and all subsequent hacks at that machine.
Once detected, you can still continue to hack targets, but from that point on you are being traced, and as soon as the trace reaches 100% the machine will be locked down permanently, along with other drawbacks (see the “risks” section further down).
You’ll never be detected immediately on connection, unless you’ve accessed and hacked the same machine before, so you’ll always get at least one chance to hack a new machine before anything starts to happen (or decide that you don’t want to mess with that particular machine).
You also have the choice to disconnect and start over later, but subsequent unauthorized connections to the same machine are more likely to be discovered, not to mention the chance of immediate detection on re-connection.
Manual Hacking
Every hacking command can be entered manually if you know the syntax, even when it’s not listed as a target. This is considered “indirect hacking,” or attempting to access a part of the system further away.
Hacking indirect targets is more difficult, but can occasionally be useful for getting information you really want, picking up where you left off when hacking bits of the story, or entering “secret commands” obtained via NPCs.

Manual hacking. Like a normal terminal, previous commands are stored in a buffer so they can be easily recalled and modified if necessary.
Manual hacking is really only meaningful for terminals, which can access a large variety of data unlike other types of machines, which are hacked mostly to operate rather than use as gates to information.
Risks
While hacking is not a mini-game in the traditional sense, there is a bit of meta-decision making beyond simply what you want access to, since being traced has one or more drawbacks.
The obvious one is that you’ll be locked out of that machine permanently. Aside from lockout, there is a chance of “feedback” whereby you’re attacked through the system itself, causing corruption and/or possibly frying one of your active hacking utilities. More certain is that after tracing your location one or more robots will be dispatched to investigate the source, and patrols in the area might also be increased.
Another category of negative effects I’m still undecided on are those that make it “seem” like you succeeded in a hack, but actually failed and the negative results will only become apparent later, like incorrect information, or a repaired part that later malfunctions and/or sabotages you, or even a fabricator-constructed ally that later defects to the other side in the heat of battle. While they could be fun, these could also end up just being really annoying and make hacking seem to too dangerous or unreliable for the player since they’d essentially be unavoidable (adding a part that detects/avoids this doesn’t prevent it from being an annoying mechanic).
Hacking carries no risks until you are traced, so when to quit is up to you (it will take a little experience to figure that out, but at low-security machines it won’t happen too fast).
Utilities
There are six categories of hacking utilities, none of which are required, but when present and active will each assist with a different aspect of the hacking process.
- Analysis: Increases the rate of familiarity improvement
- Stealth: Reduces chance of detection
- Attack Strength: Increases chance of hacking success
- Tunneling: Bonus to indirect hacks
- Evasion: Reduces amount by which failed hacks increase chance of detection and (if already detected) tracing progress
- Defense: Protect against feedback
Later posts will cover each of the current machine types, and discuss their respective functions.
Update 161119: Nearly three years after this original post, I’ve done a summary of improvements to the hacking UI experience as Cogmind approaches completion.


