While earlier in Beta 11 development I already revisited and expanded Cogmind’s selection of parts geared towards information warfare, there was a need for yet another new one to complement the upcoming Heavy class. This time it’s a big one with even more (big!) benefits but also more (big!) drawbacks! Introducing the Active Sensor Suite…
(Yes it comes with an unfortunate acronym that will no doubt see plenty of use in the community, but I decided that thematically and logically this full name would most suitably conform to the part naming conventions given its functions so I went with it anyway :P)
Look at all that sensing power!
As you can see it’s a three-slot utility--we didn’t even yet have any double-slot infowar, although technically multiple types do work in pairs and require two slots to achieve their full effect. This large slot size is a bit of a negative, although recall that the storage rework did technically free up more potential slots for use elsewhere, so we do want to create even a greater number of options to utilize those.
On top of that the Active Sensor actually can’t be removed without destroying it, Processor style, so it’s not the kind of device that can be stashed away to keep it safe during hostile encounters (drawback detected).
Although a relatively high-rating prototype, it can still be acquired earlier in the game from the Heavies that use it (so there’s at least a reliable source, though this could technically be seen as a drawback since salvaging a Heavy also requires attacking it in the first place :P).
See the Unseen
The Active Sensor Suite’s main new function is to allow you to see the “desire paths” I wrote about in the previous article. Thematically speaking, as per the in-game description of this effect it “detects long-term residual evidence of prior robot activity within field of view.”
In that article the WIP samples were shared in red, but in practice the final color chosen to represent these paths is purple.
Map excerpt of desire path visualization via Active Sensor Suite (tiles mode)
Map excerpt of desire path visualization via Active Sensor Suite (ASCII mode)
While active, newly discovered path segments are highlighted for a moment (the duration is adjustable) to give an idea of how “heavily trafficked” an area is over the long term, which as described before could be useful knowledge for more quickly locating interactive machines and exits.
Just follow the purple brick road…
Super Sensor Array
This three-slot sensor lives up to its slot count by also simultaneously functioning as both the most powerful Sensor Array and Signal Interpreter available, each of which would normally require a slot of their own and not be as easily available until later. So slot-wise the path visualization functionality only costs one additional slot beyond a standard sensor set, though of course there’s also the fact that you can’t swap out this utility without destroying it.
These additional abilities are why the activation animation for the Active Sensor Suite highlights a circle (the detection range) and for the first portion uses an animation similar to the signal interpreter animation itself.
Multipart activation animation for active sensors.
Toggling the suite is also how you view all your known/previously discovered paths, since those do not change during your short stay on the map and you may want to reference the full layout again later after having explored more. The length of time they remain visible is adjustable in advanced options, and unlike other toggle animations this one doesn’t disappear when you shift the map.
Checking out a wider area of known desire paths extending beyond the map view. (The visualization duration is automatically extended while panning the map.)
The sensor effect is actually even better than the best arrays, because active sensors are also immune to almost all forms of blocking and avoidance, including even Watcher jamming, Phase Generator scrambling, and Heavy AOE cloaking.
The Biggest Drawback
So far we have a few common technical drawbacks, but the real mechanical drawback I’ve yet to introduce…
Well it turns out 0b10 bots don’t really like you so actively scanning the Complex: Each new bot you scan with active sensors eventually contributes to notching up your alert level, in addition to causing a heightened response from 0b10 in the form of investigations. Security and surveillance-type bots care the most, but any combat bots will report being scanned and the effect adds up over time.
(The original test implementation of this mechanic contributed fractional amounts to alert on a per-turn basis depending on the number and type of enemies being scanned, but that meant it could be more advantageous to occasionally toggle the sensor off when there are certain, or too many, enemies nearby, introducing the kind of tedium we don’t really want more of here.)
In either case, an alert-based approach is clearly somewhat at odds with one of their main uses, but they’re quite powerful overall and big benefits must come with big tradeoffs. We’ll have to see how people actually put these to use.
At least this particular drawback only comes into play within 0b10-controlled areas--outside such areas you have free reign to use it without similar consequences.
desire path (n.) -- a planning term referring to a path made by walkers or cyclists, as opposed to one that is officially planned
For years I’ve always been interested in making some kind of utility that allows you to see paths that were traveled by robots, partially because it just seems like a neat thing to do, something which would also probably look cool :)
Of course if the player is just entering a map and the entire population has literally just been “spawned in” as well, then they haven’t actually done anything yet and this utility wouldn’t even have any real information to display at the time, making the environment seem pretty artificial. What we want is a way to basically fake the data to reflect actions that might’ve happened before.
At the same time, with a theoretical utility function such as this there’s also the concern that where actual robots have been moving in the past hundreds or even thousand turns probably isn’t really very useful information for the player. To be useful, it’s less about where these actual robots have moved, but the areas we imagine they might’ve been more likely to visit over a longer duration, thereby highlighting potential “points of interest” on the map, points that the player probably finds interesting as well…
Time to fake some traffic data!
Basically we need to:
Identify points of interest
Assign them relative levels of importance
Plot paths between them to generate a reference map for visualization purposes
I also needed something to call this feature internally, so I looked up the term to describe natural paths gradually created over time by people taking routes that don’t perfectly align with available pathways. They’re apparently called “desire paths” (among other names).
Now obviously 0b10 is mostly straight corridors with fewer open areas that work differently than people walking through an area like a park and cutting corners through the grass rather than following walkways. Robots are still essentially confined to these corridors and we don’t see them blasting through walls just to make a shortcut (unless you’re a Behemoth? :P), but they’re also not always moving in cardinal directions and taking perfect right angle turns (even if in the world of Cogmind doing so would technically not affect travel time!). Instead we see them frequently cut across areas in what looks like more natural movement, or taking a shortcut through a room where it’s convenient, or slipping between several machines in an array rather than going around the edge of the array, and so on.
A very early implementation of the desire path system.
Those big squares filled with numbers are junctions, one of the “points of interest,” where the number represents their respective rating. Junctions are rated based on their size and number of corridors and rooms they link to.
Aside: In working on this feature I discovered that in all prior versions junction ratings have been incorrect due to forgetting to initialize their value before a different part of the code actually did the calculations, meaning that junction Sentries have been misplaced this whole time. I always kinda wondered why they seemed to be in random junctions rather than the important ones, but it was never all that important so I didn’t look into it. Now we know xD (Junctions are now properly rated, though this may not have a huge impact on Sentries going forward anyway since the most important junctions are going to be repurposed for another defensive purpose coming soon…)
Clearly the first thing we need to do here is identify exactly what types of locations count as points of interest for our purposes:
Exits: Duh
Machines: The interactive ones, yup
Junctions: Mainly to help connect everything and also make the path map seem more realistic
Chutes: Technically count as exits of a sort, and also for realism since as we know there is some 0b10 activity centered around these
And that’s pretty much it? Really that covers most of the relevant core environmental features, and although I had some other ideas, if there are too many points and a dense web of paths connecting them all, then the entire map is filled and the information becomes mostly useless anyway, or at least really difficult to parse.
Each type of point has its own level of importance, and the links between more important points will appear more prominently in the desire path visualization. Point types are also broken down further where appropriate, since not all exits are created equal, plus we can assign different values to different types of machines, and junctions can use their calculated rating as their importance (which is how I discovered that bug since I needed the actual number here and something was seriously off at first :P).
The general idea for the process is to plot a path between every point and every other point, assigning the average of each endpoint’s importance (“desire path value”) along the entire pathway.
Now it’s not realistic or useful to literally connect every point on the map--we don’t want some tiny Terminal in one corner of Factory pathing its way over to a caves exit on the opposite side, so we’re going to need more variables in order to limit these connections in a realistic manner. Each point type and subtype also define a maximum connection range and maximum path distance. The former requires that endpoints be within a certain direct range from one another (also nice because this value can limit our number of pathfinding calculations by not even calculating those which are clearly too far away), and the latter path distance limit will be some larger value to allow a path to snake over to its destination if necessary, but still stop it if the direct range check found it was simply on the other side of a wall but actually reaching it requires an excessively circuitous route.
Source code values describing how each point point of interest integrates with the web of paths.
With these three variables in action, our desire path map should start to look better.
A further refined implementation of the desire path system.
Additional notes about the above map:
Unlike the earliest sample image I shared before, the paths have now been fuzzed to look a bit more reasonable and pleasant. This is accomplished by adding half of each path’s value to any adjacent positions not on the path itself, and can also represent bots moving around each other, or patrols checking out rooms via doorways, etc.
Overlapping paths of course increase the value of a route even more, which is what the brighter lines represent. Having access to this information brings interesting implications for navigation… Is that bold line leading to an exit? Or a bunch of useful machines? Or… a Garrison!
More path and value tweaking might still happen depending on the results of the current prerelease version patrons are testing, but it’s in a decent state for now so I put that on pause to see how that plays out.
Challenges
For the most part this system seems to work nicely in Complex 0b10 maps, which as you can see it’s been initially designed for, but what about caves? What about custom prefabs? Oh my…
Defining a list of points of interest is easy when our maps are procedurally generated and everything can be managed automagically with a simple set of data and algorithms, but when you mix in all that handmade content, that calls for… you guessed it… handmade points of interest xD
So yeah, looks like we’ll need to expand this yet further if we’re going to add it at all. For this purpose I added an additional range of point types that can be manually placed inside prefabs to link up with other points as usual. These are actually listed at the end of the POINT_OF_INTEREST_DATA I shared above.
As an example, here’s the Exiles lab in REXPaint, with my test points placed using pink numbered identifiers in one of the layers.
And here’s that same map with the resulting desire path visualization as generated in the game
Now I’ll be the first to admit this information won’t be particularly helpful when you visit the Exiles, but it’s a part of maintaining consistency and polishing a game, so what are you gonna do? :P (okay technically for now it’s even going to be impossible to get the ability to see these paths before reaching this very early map, so it’s totally unnecessary here, but I needed a big prefab test case, and one that wouldn’t require sharing spoiler locations!)
That’s the extent of what I’ve done so far in terms of prefabs, just to test it out, but this is going to be a fairly large amount of work, parsing through Cogmind’s many hundreds of handcrafted rooms and areas to assign these! (Some special types of procedural maps will also likely need their own rules for additional points.)
I’m waiting to see more playtest results before assigning all the manual values, since the amount of effort required means it had better get done right the first time!
Processing power is another concern when working with this many calculations at once. Altogether the desire pathfinding (and associated fuzzing process) does indeed slow down map generation, though it’s currently within acceptable limits. To make sure I wouldn’t need to optimize the algorithms yet I did a bit of profiling to see just how much time these desire paths adds to the map initialization process in various locations (“initialization” includes both generation and all post-generation steps, everything needed to get the map ready to start playing in):
The percentage increase to map creation time caused purely by path-related calculations on that map. Comparisons were in each case of course performed on the same map via seeding, where the only difference between the two was the addition of the desire path step.
Overall the cost shouldn’t be noticeable, especially given that some maps themselves may occasionally take up to 2~4 seconds to load due to throwing out a large number of invalid layouts.
A feature like this would be pretty easy to optimize since you aren’t going to need the data within the first split second of entering a map anyway, and nothing else is dependent on them, so we could easily defer these calculations until after the map has been loaded and distribute it over the first handful of frames. My first profiling results were actually noticeably slow, but that was during the implementation phase when I was using the slower debug version, so I eventually went on to compile the above data using the release version to make sure.
Other notes:
Do we want to let desire paths be somewhat influenced by actual robots and their activities? Probably not, because again it’s not especially useful, and although it could be more realistic or interesting in other ways, I’ll be theming this data such that this factor won’t be too relevant or necessary.
How does the player access this intel? That’s for next time ;)
Update 210802: Meet the Active Sensor Suite, the gateway to getting all this info and more!
With fundamentals like storage and propulsion out of the way, it’s time to turn our attention to weapons! Originally there weren’t any plans for sweeping updates to weapons and I just wanted to rebalance them in a few areas, but as you’ll see here, a few smaller ideas ended up snowballing into something decidedly bigger…
Damage Types
To set the stage, let’s first do a quick overview of the state of damage types as of Beta 10. Cogmind has nine damage types, each with their own common properties:
Kinetic (KI): Ballistic weapons generally have a longer effective range and higher chance of critical strike, but suffer from less predictable damage and high recoil. Kinetic cannon hits also have a chance to cause knockback depending on damage, range, and size of the target.
Thermal (TH): Thermal weapons generally have a shorter effective range, but benefit from a more easily predictable damage potential and little or no recoil. Thermal damage also generally transfers heat to the target, and may cause meltdowns in hot enough targets.
Explosive (EX): While powerful, explosives generally spread damage across each target in the area of effect, dividing damage into 1~3 chunks before affecting a robot, where each chunk selects its own target part (though they may overlap). Explosions also significantly tend to reduce the amount of salvage remaining after destroying a target.
Electromagnetic (EM): EM weapons have less of an impact on integrity, but are capable of corrupting a target’s computer systems. Anywhere from 50 to 150% of damage done is also applied as system corruption, automatically maximized on a critical hit. EM-based explosions only deal half damage to inactive items lying on the ground.
Impact (I): Impact melee weapons have a damage-equivalent chance to cause knockback, and while incapable of a critical strike, they ignore coverage and are effective at destroying fragile systems. For every component crushed by an impact, its owner’s system is significantly corrupted (+25-150%), though electromagnetic resistance can help mitigate this effect.
Slashing (S): Slashing melee weapons are generally very damaging, and can even sever components from a target without destroying them (damage/3% chance).
Piercing (P): Piercing melee weapons achieve critical strikes more often, are more likely to hit a robot’s core (doubles core exposure value in hit location calculations), and get double the melee momentum damage bonus.
(the remaining two excluded from this discussion are rarer special types used by certain factions)
[Reminder: The above descriptions are based on Beta 10.2--some of these factors are now changing!]
As you can see from the descriptions, damage types don’t always have many unique properties of their own, but are in part or entirely defined by the class of weapons that inflict that type of damage.
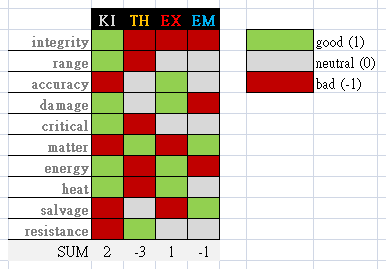
Before starting work on Beta 11 I put together a chart summarizing the primary four damage types, comparing them across a variety of categories (the other three melee-oriented types are less directly comparable since they’re used in very different contexts, and on a more limited basis):
Comparison of primary Beta 10 damage types.
The purpose of the chart was to force me to think of what color to assign each box and why, not only perhaps helping to visually identify areas that might be reasonable targets for rebalancing, but also as a tool to provide semi-quantifiable supporting evidence for buffing or nerfing a given damage type.
Of course this approach paints weapon types in fairly broad strokes, and although they were designed that way, such that weapons of a given category will generally have somewhat predictable properties around which one can build with some consistency, there will always be exceptional subtypes within each category that don’t fit the same characterization. For example Hypervelocity kinetic weapons would have quite a different color scheme if given their own column, but they are a relatively small minority and of secondary concern here since they have their own pretty clear balancing factors.
Also in some cases a box could go one way or another depending on the situation, for example EM resistance where one could argue red is an appropriate color since many of the most challenging enemies are highly resistant or even outright immune to it, but against other robots it completely circumvents most defenses and armor to reliably kill targets, also reducing their effectiveness in the process.
There are too many unrepresented nuances for the precise “sum” of each column to be especially helpful on its own, though it will be interesting to compare any relative shifts when we look at the chart again later.
Nerfing EM
Although not really reflected in the chart considering it has the second-lowest “sum” (negative even!), due to the unique mechanics of electromagnetic damage it has always been somewhat overpowered, especially (but not only) in AOE form. Sure it’s not really usable against the most dangerous enemies, but you just need to carry around alternative parts for situations like that and rely on EM to solve most every other problem pretty handily! So an EM nerf has always been inevitable, but at the same time very challenging to pull off so I never moved on it for a long time. The time is now.
The goal is not to nerf it into the ground or anything, just improve EM weapon balance so that this particular damage type isn’t so clearly superior over others in a majority of cases.
The first nerf (yeah there are several :P) was already implemented back in Beta 9, and therefore reflected in the chart above: Energy costs for EM weapons were doubled across the board. I think this has worked out pretty well and had the desired impact, requiring more supporting energy and making sudden or sustained EM combat more difficult, or at least increases the preparatory requirements for doing it. However, increasing the cost in terms of an unlimited resource (as opposed to matter) still doesn’t directly address the advantages of having a class of weapon that can not only bypass most enemy defenses but also tend to create more salvageable parts.
Now obviously the easiest way to nerf a mechanic is to outright weaken it, reducing its raw ability to do what it already does, but power reduction is boring and best avoided if possible, so I kept resisting that approach and for weeks tried to come up with alternatives. Like I said, hard to balance xD
We don’t need a weaker EM effect, what we need are more trade-offs for using EM weapons, trade-offs that specifically target some of the reasons players use it, basically new mechanics that increase the challenge of using EM without making players not want to use it at all (which is what weakening it would do).
Enter: Corrupted parts.
Corrupted status?!
One of the big reasons for using EM weapons is that they’re good for getting usable (non-device/processor-type) salvage from targets, and we want to keep that feature, but how could it be altered in a way that adds interesting trade-offs?
In hindsight it seems obvious, but there were lots of other ideas floated which just didn’t work, or didn’t make sense, and this one both works and makes sense: Corrupted bots (those that die to corruption, or were partially corrupted then destroyed by something else) often drop corrupted salvage, and attaching corrupted parts increases Cogmind’s system corruption. It’s no small amount of corruption, either (the precise value is dependent on the bot’s original corruption level, and of course somewhat randomized), so attaching these parts means having to deal with any of a number of side effects (if you’re not familiar with system corruption I wrote about this a bit in my old article The Importance of Roguelike Food Clocks).
Corrupting salvage via EM damage.
Corruption alone is not run-ending, so the player has a choice to risk managing these side effects in order to immediately take advantage of EM salvage, or saving corrupted parts for later when they have an opportunity to remove the corruption. Thus relying on EM weapons makes it less likely you’ll have access to many spare parts in the near-term, or that immediately using newly-acquired powerful tools will come with an added cost. Saving corrupted parts for later adds inventory pressure by taking up valuable space, especially for players who want to do their corrupt part attaching shortly before reaching an interval where they can clear their corruption immediately, and have to carry the parts until then, whenever that may be…
Corrupted parts in inventory, where they also have a unique color and carry the “Corrupted” prefix.
As a reminder, attaching a corrupted part also comes with an extra animation.
Anecdotally based on both my own experiences and that of players testing out the prerelease, this mechanic is working quite nicely--definitely still worth using EM, but also generally more challenging :D
Another common use for EM weapons is reliably downing huge groups of enemies with one of the powerful launchers, creating huge amounts of salvageable material in the process. The salvage part is already balanced via the corruption mechanic, in fact even more so because launchers also increase the corruption of parts sitting on the ground! But another mechanic was introduced here to add some amount of risk to using this tactic at point-blank range while ignoring the lower levels of corruption this causes the player/Cogmind itself: Being hit by specifically AOE EM damage allows for the spectrum-induced effect to cause a chain reaction in Cogmind’s power source, blowing it up.
Unlike Cogmind using EM on other targets it doesn’t apply to being hit by regular direct-fire EM weapons, since that’s a bit too common and would be seen as unfair. This pretty much just targets the player (since enemies don’t really use this type of weapon), and overall it won’t come into play all that often across runs, I’m sure, mainly added either for fun or to make players less likely to repeatedly use this particular tactic.
Aside from strategic options to reduce the impact of these EM-related mechanics on a particular build, technically Power Shielding protects against the chain reaction effect so there is a way to negate that if so inclined, and if lucky there’s also a unique part which prevents any corruption gain from integrating a corrupted part, but it’s only found in the late game (if available at all).
With this I think we’re probably done with EM. It’s in good shape. Now it’s time to buff something else…
Kinetic Cannons
Kinetic cannons have always been tough to build around. They’re a very appealing weapon type for their cool factor and ability to blow bots to pieces (even at very long range if desired), but they have so many drawbacks that they’re really hard to use for any sort of sustained combat. They have high recoil, overheat after a while, require large amounts of matter to keep firing, and worst of all don’t leave much left of a target by the time they’re done with it. As such, kinetic cannons generally require a disproportionately large ratio of supporting utilities and resources to keep them in action compared to other weapons, and while they nearly always seem really great at first, more than one run (of my own, not to mention others!) has suddenly gone south simply due to the high costs and negative feedback loop of using them xD
Like with EM we do want interesting trade-offs for using a particular weapon type, but too much is too much, so clearly we need to pare back one or more of these drawbacks.
I decided to first attack this issue from the matter resource angle. But instead of outright reducing the costs or reducing their effect on salvage, neither of which are really in line with their nature (and also kinda boring), I came up with a more interesting alternative: Shooting a target with kinetic cannon projectiles blasts some amount of matter onto the ground near/behind them with each shot.
Using a kinetic cannon to shoot matter off targets.
The formula determining the amount of matter is based on the weapon’s negative salvage modifier, meaning the attacker basically always has a chance to retrieve a certain ratio of the matter used to attack the target, although never the full amount (technically being shot by enemy kinetic cannons also has this same effect!). The difference can be made up via matter filters or acquiring matter from other sources as usual, and the matter blast ratio can be tweaked as necessary, though based on my testing it seems pretty balanced at the moment. Either way, this new mechanic has a noticeable effect since hitting robots with kinetic cannons otherwise leaves little to no salvage.
It’s also neat that you can technically even acquire the matter while still fighting enemies by using a Tractor Beam, so there’s that synergy (which already existed before, but is now even stronger). Without taking advantage of that option (or if too far away to collect), one of the new challenges/trade-offs comes into play in that you may have to move around to collect the matter, which costs time and may not be feasible until the fighting is over.
While designing the blast matter mechanic I did somewhat mitigate the number of required collection destinations by having each blast be more likely to drop matter on locations in the area already containing matter, not to mention this is pretty important for keeping a KI cannon battleground from being completely filled with matter and leaving no space for other parts to drop! I mean filling an area with matter is cool and all, but Cogmind’s one-part-per-cell UI restriction could cause KI cannon builds to have a pretty significant impact on the lootscape.
This wasn’t enough for me. Kinetic cannons still needed a little something more, something also aimed at counteracting their negative salvage modifier in an interesting way. The idea was to give KI damage yet another special side effect on cannons, allowing them to sometimes blast parts clean off the target so that even though the majority of parts still wouldn’t drop normally once a robot is destroyed, 1) at least something useful might be knocked off beforehand, and 2) as far as the enemy is concerned that part is “destroyed” since they can no longer reattach it for use anyway.
Say goodbye to those Light Treads! You can’t use them anymore, but I might grab them later…
Even better, the second part damaged and knocked to the ground is different from the one actually hit--when this effect applies it blasts off a separate part based on slot-wise impact rules rather than coverage, making this side effect that much more effective since it affects two parts (and ensures the dropped part is in a better state in case the player wants it).
So what stat is this blasting effect attached to? Well it was originally envisioned as a side effect of the damage type, only applying to cannons and only on a critical strike, somewhat similar to how slashing damage can sever parts (but with more limitations…), then I realized this would add yet more opaqueness to the system, and there’s a much, much better solution here: Let’s instead use this opportunity to add a variety of critical effects, part blasting being just one of them!
Critical Strikes
Ever since the 2012 7DRL, Cogmind only ever had one type of critical strike across all weapon types, with a high chance on some, low on others, and many more incapable of causing a critical hit. If it procs, it simply destroys the target part (or robot if it hits a core), regardless of integrity or damage amount. As with any additional stat this provides another lever to differentiate weapons, at the extreme end even creating a unique range of Hypervelocity weapons with very low damage but much higher crit chance.
But while working on the kinetic cannon design I noticed that the desired effect would be better off as a separate type of critical strike altogether, more clearly signaling to the player that it’s something different rather than making it an essentially hidden side effect of a regular critical like I originally imagined. And if we’re going to add a new critical type here, this means we can do a bunch more criticals for other weapons to give us even more design levers for further differentiation, greater variation, better balance, more nuance, and of course more fun, too…
Cue lots of brainstorming--this whole kinetic thing snowballed into something much bigger :P
By the end I chose 12 different critical effects that could be used to tweak weapon balance, potentially give more room for build creativity, and lead to interesting tactical situations:
Burn: Significantly increase heat transfer (TH guns)
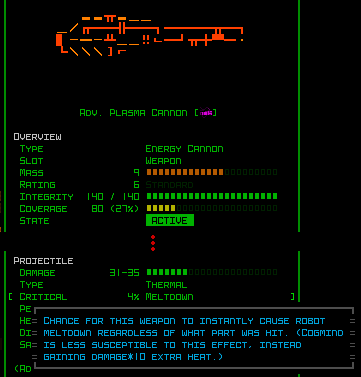
Meltdown: Instantly melt target bot regardless of what part was hit (TH cannons)
Destroy: Destroy part/core outright (= the original critical effect) (KI guns)
Blast: Also damage a second part and knock it off target, as described above (KI cannons)
Corrupt: Maximize system corruption effect (EM guns/cannons)
Smash: As Destroy, but gets to also apply an equal amount of damage as overflow damage (impact weapons)
Sever: Sever target part, or if hit core also damages and severs a different part (slashing weapons)
Puncture: Half of damage automatically transferred to core (piercing weapons)
(there are four other crit types associated with the special damage types not covered in this article: Detonate, Sunder, Intensity, and Phase)
As you can see above, critical types are for the most part intended to be associated with a particular category of weapons, both for logical reasons and to aid familiarity. In most cases we have different effects for each damage type, as well as for guns vs. cannons.
In a few cases we will need to make exceptions, however, so by necessity the critical effect type is set on a per-weapon basis. To bring up the Hypervelocity KI cannon example again, it wouldn’t make sense for them to have the Blast critical (and would also significantly imbalance them), so they instead continue to use the original Destroy critical effect.
Also a given weapon might still have no associated critical effect, although that situation is less common now that we have a variety of types to choose from, especially as they’re designed to be appropriate for each base weapon type. Like in previous versions almost no thermal weapons ever had a critical effect since that was originally a mechanic added primarily to differentiate kinetic weapons, but now that we have the Burn and Meltdown criticals almost every thermal weapon may have an effect, too!
TH cannon Meltdown context help.
Naturally as part of this new system every single weapon needed to be revisited to consider its critical effect and the chance to proc, so there was lots to do in terms of rethinking stats. One important factor to keep in mind throughout this process is that these are meant to be at least somewhat special when they occur, the exception rather than the rule, so I wanted to keep the percentages relatively low. In some cases by the end I had gone back to readjust the actual effect itself to be appropriately powered for something that happens with lower frequency.
Theoretically a potential new positive side effect from these criticals is that new build styles could emerge based on evolving extra weapon slots in order to stack critical effects. Although increasing the variety of crit-stacking builds was not a primary goal behind these mechanics, I did have to take that possibility into account since if it’s beneficial to stack them then of course players are going to do that, especially if such a strategy turns out to be OP ;)
One crit of note in terms of design is the “Sever” effect, which was originally a side effect of slashing damage (using the formula mentioned earlier, damage/3%), but rather than having yet another separate effect tied to this weapon type, the crit expansion was a good opportunity to both make it more obvious and decouple the effect from damage, which is otherwise sometimes limiting when it comes to weapon design, as the ability to sever is then always tied to the amount of damage dealt. Now it can be a separate static value that’s easier to control for, naturally at the cost of somewhat nerfing slashing weapons where it was possible to increase raw damage (and therefore severing chance) via momentum or other buffs.
Crit Immunities
The original critical system was quite simple, as described, and in the early alpha days (2015) stacking kinetic guns capable of dealing damage as well as Destroy criticals was so powerful that eventually some important robots like NPCs became completely immune to critical destruction. This was a pretty heavy-handed nerf that basically killed off the crit stack build among serious players since it couldn’t be used to take on the most challenging enemies.
More recently the crit stack build was once again made viable by compromising with two levels of immunity: total Critical immunity (or once again immunity to all critical effects--used rarely and only very special cases) and Coring immunity, which applied to most of the aforementioned NPCs/challenging bots so that at least they couldn’t be outright destroyed by a crit against their core, but you could still happily use a crit stack build to strip them clean. This worked out pretty well and suddenly crit stacks were back on the menu :)
But now we’ve got a bunch of new critical effects other than simply Destroy, so what to do with the immunity system?
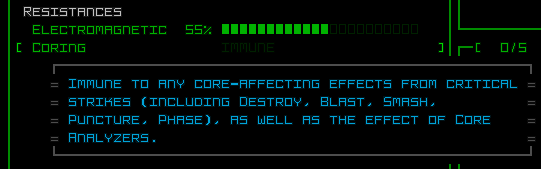
I certainly wanted to avoid creating an overly complex set of immunity rules, though it at least turns out there wasn’t a need for additional immunities, just mainly a need to get more specific with regard to the Coring immunity. It now has to explicitly list the types of effects it provides immunity against, naturally anything attempting to directly affect a robot core, including Destroy, Blast, Smash, Puncture, and Phase.
Coring immunity context help.
Also some separate existing immunities apply where logical, like the Dismemberment immunity of course blocks the Sever critical (as it used to block the slashing damage sever effect), and Meltdown immunity protects against… Meltdowns :P (which are now a critical found on TH cannons, but already existed before due to heat transfer buildup)
Crit Messaging
Another new issue surrounding critical effects involves log messages. Now that almost every weapon has one (and sometimes a single crit has multiple effects!), critical messages are going to become more common, but we only have six lines in the main message log and don’t want that to get too clogged up.
One important change here was to only report critical hits if actually applied to the target, whereas before in order to provide feedback to the effect of “technically a critical strike roll just passed” it would always show regardless of later not applying due to the defender’s shielding, immunities, or for some other reason.
Now that the crit shielding situation is a bit more complex, I also felt it was important and useful to report crit blocking results, but didn’t want to clog up the regular log with that info, so I instead have it reporting to the full detail combat log where players interested in all the little details from a combat encounter will be looking for that sort of thing anyway.
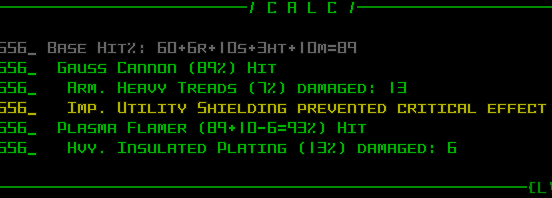
Combat log reporting that a target was shielded from the Gauss Cannon’s critical Blast effect.
Most importantly, because critical effects can sometimes have a significant impact on the course of a fight, I wanted them to be reported directly on the map so that looking at the log doesn’t become a necessity (as per standard Cogmind’s design). Previously we only had the Destroy effect, which simply piggy-backed on the part loss popup label, but now we’ve got a bunch of new ones which players are going to want to see when and where they’re taking effect. So those now also show directly on the map, in a new color.
Sampling some of the possible critical effect popups.
One exception is the Burn crit, which tends to have a higher proc chance than others, and many robots use thermal guns, so to avoid too much “Burn popup spam” on the map, those don’t actually start appearing unless the target is already getting hot and it might start to impact the outcome of the fight because they’re going to overheat, melt or at least have trouble aiming.
All of the critical mechanics have been implemented and I’ve been streaming my first run with them, in particular later on relying mostly on KI cannons to enjoy their newfound matter sustainability and the Burst crits:
Hooray for sustainable KI cannon combat! \o/
Damage Types Revisited
With all that behind us, it’s time to take another look at the damage chart from earlier after applying the Beta 11 changes.
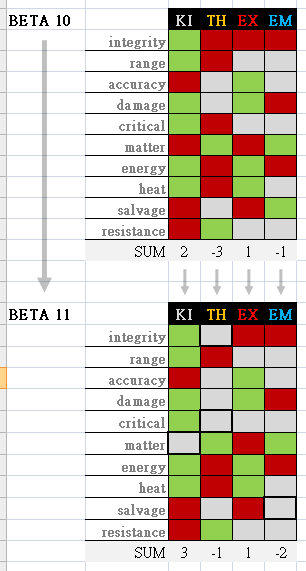
Comparing damage type characteristics in Beta 10 vs 11. Changed boxes have a bold outline for emphasis.
In summary, we got rid of three red boxes (KI/TH buffs) and one green (nerfed EM), turning them all gray. Ignoring explosive damage since nothing changed there, let’s examine the other columns…
Kinetic
Interestingly, KI damage originally had the highest sum of any column, and technically was already a pretty good damage type, but still ended up getting buffed because although guns were great (and remain unchanged here), the cannon situation was dragging down the damage type, and that’s no longer the case due to the matter mechanic changes. I left the salvage factor unchanged since even though cannons blasting off parts is now a thing, that’s not a significant source of salvage in itself and negative kinetic salvage modifiers are as savage as ever.
Thermal
The biggest sum change among the damage types is TH. Although as I’ve said these sums aren’t great for comparison between damage types, the original -3 did kinda stand out and reflected reasons players tend to shy away from thermal weapons except in special cases, so there was definitely room for adjustment there.
Thermal weapons were by design excluded from the old crit system, but with our newly expanded system most of them got their own effects which potentially make thermal weapon stacks more viable now.
In terms of impact on TH viability though, that change is secondary to the even more fundamental stat adjustments coming in Beta 11: Thermal weapon integrity is significantly increased alongside a reduction in coverage. They’re still not as sturdy as kinetic weapons, but no longer so weak as to fall apart easily, while balancing their reduced integrity against a lower chance to be damaged in the first place assuming other sources of coverage like armor, thus helping carve them out a bit of a separate niche here.
Thermal weapon integrity was especially low as far as projectile weapons go, based on assumptions made way back during 7DRL 2012 work and never revisited since, which is what a big part of this ongoing design overhaul is about, looking at many aspects of the game in a new light offered from years of play experience.
Thermal weapons are generally underutilized, and this will give them more staying power. We’ll see how it works out, since no one’s actually played with these new weapon stats seeing as I made the changes while writing this blog post and reexamining the chart along with my previous notes, AKA “development by blog post,” wherein things get done because I’m writing about them ;) (not unlike “development by streaming runs,” which get me adding features I want to play with, as well as reactively updating the game based on my own findings and experiences).
Electromagnetic
Funny enough, in the chart we see EM’s sum went from negative to even more negative, yet it’s still good, a testament to just how different its mechanics are compared to other damage types (and how hard it is to nerf well xD).
EM salvage is now gray since it’s no longer quite as useful in every situation given the corrupting effect, but still certainly not red since it’s still good for ensuring a larger raw amount of salvage in general.
Overall I think there could be more work to do in the area of damage types depending on the results of playtesting, but so far I’m quite satisfied with the results and everything’s definitely on the right track!
Part 4 in this series covers a rebalanced and expanded item and robot fabrication system which makes that feature somewhat more accessible to different build types.
The previous design overhaul discussion covered storage capping and its changes to the core gameplay, but the first experimental build we played around with also included major changes to another even more fundamental aspect of any build: propulsion. Although not all of the experiments panned out in this case, after a number of revisions I think we’re in a better place.
Propulsion (commonly abbreviated as “prop” by the community) has undergone a number of fairly significant adjustments over the years, being rebalanced in response to various other changes, or more frequently in order to buff those types which were generally underutilized--wheels became a good choice for carrying excessive mass despite their other drawbacks, treads got siege mode, and legs and treads got huge integrity boosts, plus kicking and crushing (respectively).
Flight and hover also saw some smaller changes, though not to the degree necessary to reign in their existence somewhat outside the power curve of Cogmind, so it was about time to address those and bring them more in line with how they were originally envisioned given how expert players had been able to take advantage of them.
Flight and Hover
On the surface Beta 11 significantly nerfs airborne prop by dropping their mass support even further, though in some ways it’s really more of a rebalancing since resource costs were lowered at the same time.
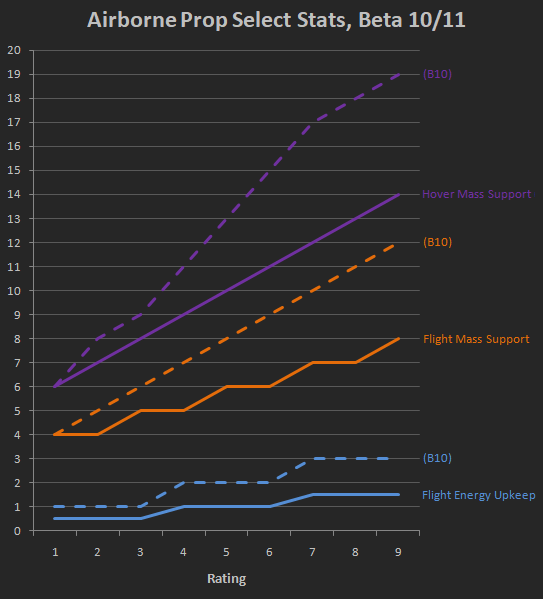
Base flight and hover stat progression, a comparison between Beta 10 and 11.
Values remain mostly unchanged in the early game, with the changes becoming more and more pronounced at higher ratings since the stats were adjusted via their rate of progression to prevent the best late-game airborne builds in particular from repeatedly becoming not only the fastest but also incredibly powerful by carrying heavy gear.
Speed alone gives a significant advantage in Cogmind, not to mention flight’s ability to hop over hostiles and escape or bypass almost any situation without fear of being boxed in, so it really shouldn’t also have access to some of the best direct combat setups.
Ideally, flight is hereby somewhat more restricted to a speedy stealth or hacker-type niche, and newly-nerfed hover can take over old-style combat flight builds, albeit at somewhat slower speeds and without the ability to hop. I say “somewhat” because even after the changes good players have proven it’s possible to put together some pretty powerful flight builds, just not quite as reliably or OP as before.
Of course with reduced mass support per unit there’s always the option to devote more slot evolutions to propulsion, thereby regaining some of what was lost, and although extra prop implies extra resource requirements to run them, it’s at least easier to do this due to flight’s lowered energy costs. Flight builds still won’t really get as heavy as they once were, or if they do the slot cost is much higher than before and such a build will be weaker in other areas overall.
Notice in the graph that I had to add decimals for this! This is actually one of the reasons why these sorts of adjustments to flight balance took so long to happen, because the relevant values were already too small to affect a different progression with whole numbers. I generally avoid using decimals on principle since they aren’t pretty or easy for players to calculate with, but finally had to bite the bullet here and reimplement a bunch of things to allow the game to accept these non-whole numbers… (almost all Cogmind code works with whole numbers). And all for a super simple set of 0.5, 1.0, and 1.5--no other weird numbers needed or used :P
The overall result is a more forgiving flight paradigm not quite as tightly balanced around having the best lightweight power generation available, so it’s a bit easier to get up and running so long as the goal isn’t to go for a heavy build (implying tons of prop slots). Thus although many players will view these changes as a big nerf, in the bigger picture they simply ensure that both hover and flight are further differentiated while better serving their intended niches.
Leg Upgrades
Speaking of niches, players have sometimes noted that legs don’t really have anything unique going for them.
This was intended, as legs are one of the most easily-acquired prop types with both decent integrity and middling speed (hence the recommendation that newer players use them), so I didn’t think they necessarily needed anything special, per se. But I eventually agreed that if we could find another effect suitable for them then it could be a worthwhile addition, especially since (as you’ll see further below) other changes in Beta 11 took away the only reason better players might opt to use them by choice (while overweight a triple-leg setup was still faster than treads).
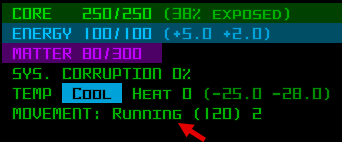
Treads with their siege mode are already clearly the best direct combat option, so let’s further differentiate legs as the mobile combat option. They’re already somewhat faster than treads and therefore partway there, so what about another benefit while using that mobility during combat? Not in the same way as airborne prop, mind you, since raw leg speed isn’t nearly enough to benefit from that, but instead something more in terms of taking advantage of the potential for unpredictable movements while dodging attacks. So instead of basing it on speed, legs have modifiers based on current momentum. (Momentum in Cogmind is displayed on the HUD along with other movement info, increasing for each consecutive move in the same direction (up to 3), or -1 for moves in the same general direction, or resetting to 1 for moves in other directions.)
While moving (and therefore having momentum), the leg movement state in the HUD shows “Running” instead of the usual “Walking.” The current momentum there is 2.
For each level of leg momentum, shots against a robot* incur a -5% accuracy penalty, so the maximum penalty is 15% (*remember most mechanics, including these, affect all bots in the game, not just Cogmind!). Leg momentum also decreases accuracy of the moving bot by the same amount.
Some benefits of legs under this system:
The most useful advantage is the ability to somewhat more safely reposition under fire when a combat situation changes, for example new enemies approaching from a different direction, or an important wall was destroyed, or a need to immediately grab certain parts nearby, or because of a crucial change to one’s build due to damage or other circumstances, or really any number of other reasons to move while fighting.
Running into view of an enemy to initiate an attack (intentionally or not :P) at least has them open fire first while your evasion benefits are active, then you wait a moment to get your bearings and open fire with a much higher accuracy.
Legged melee builds, which at least in my experience are fun and pretty decent, take less damage while charging a target or retreating to safety during a ranged confrontation.
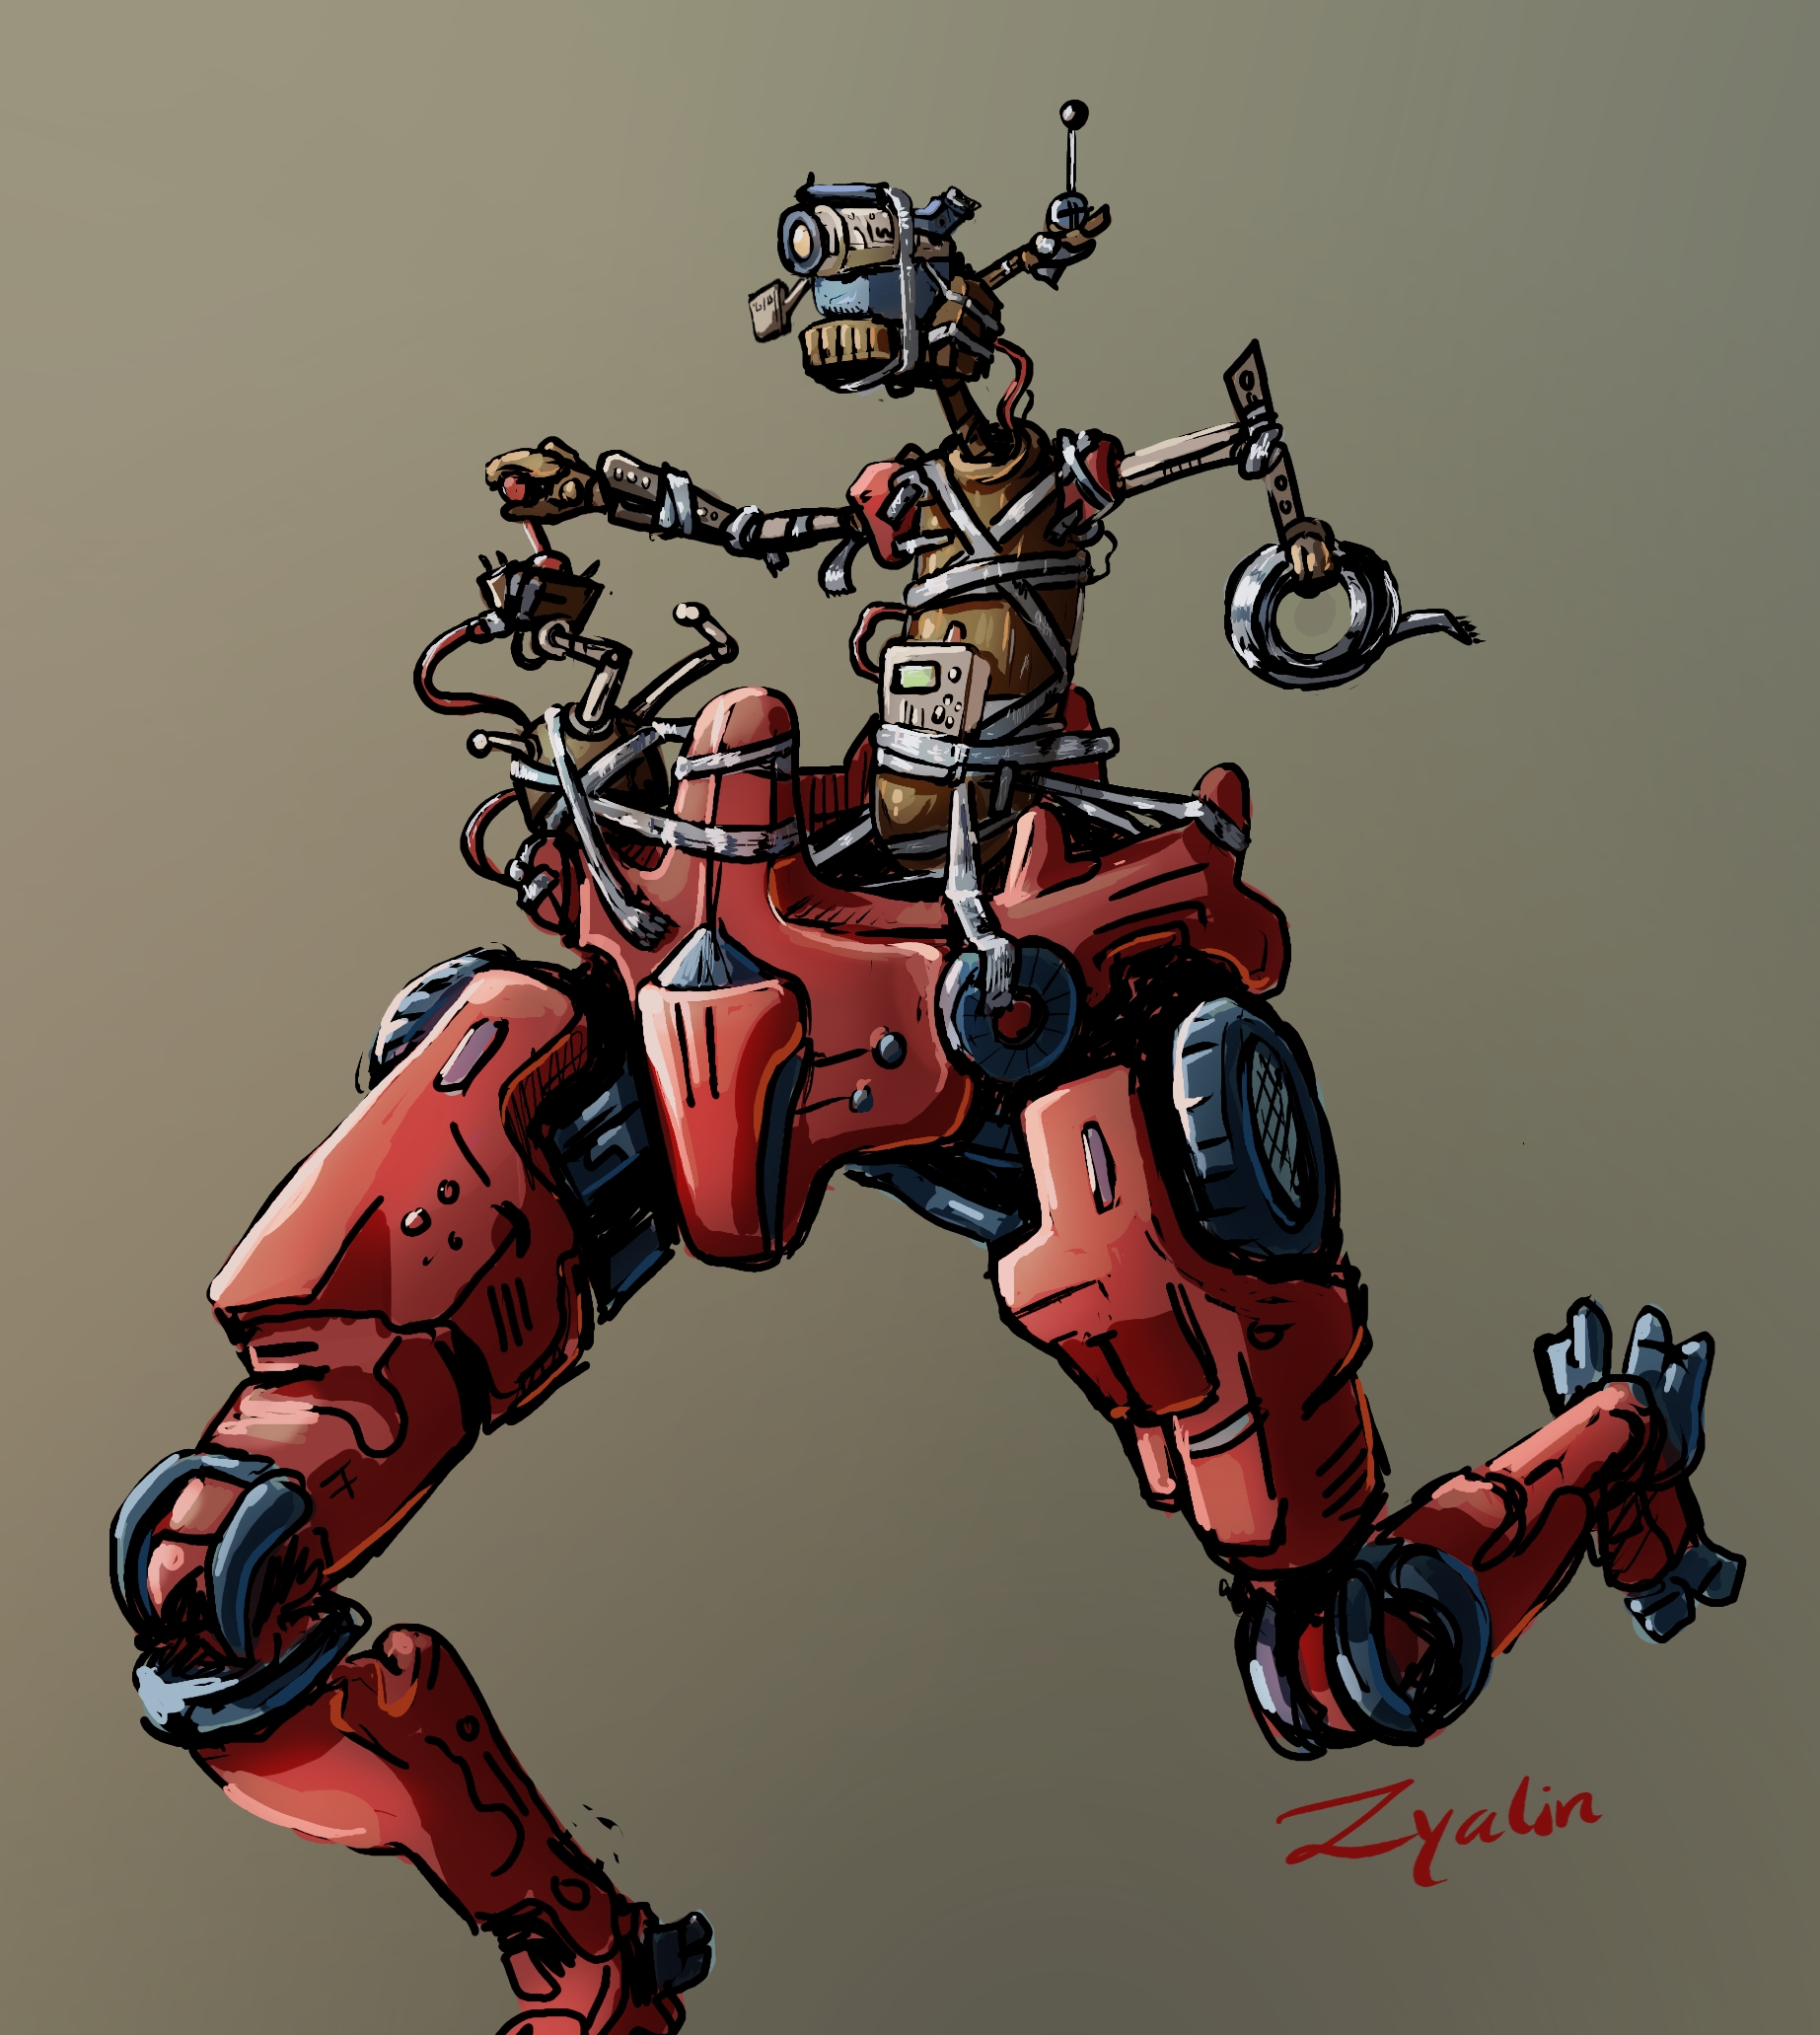
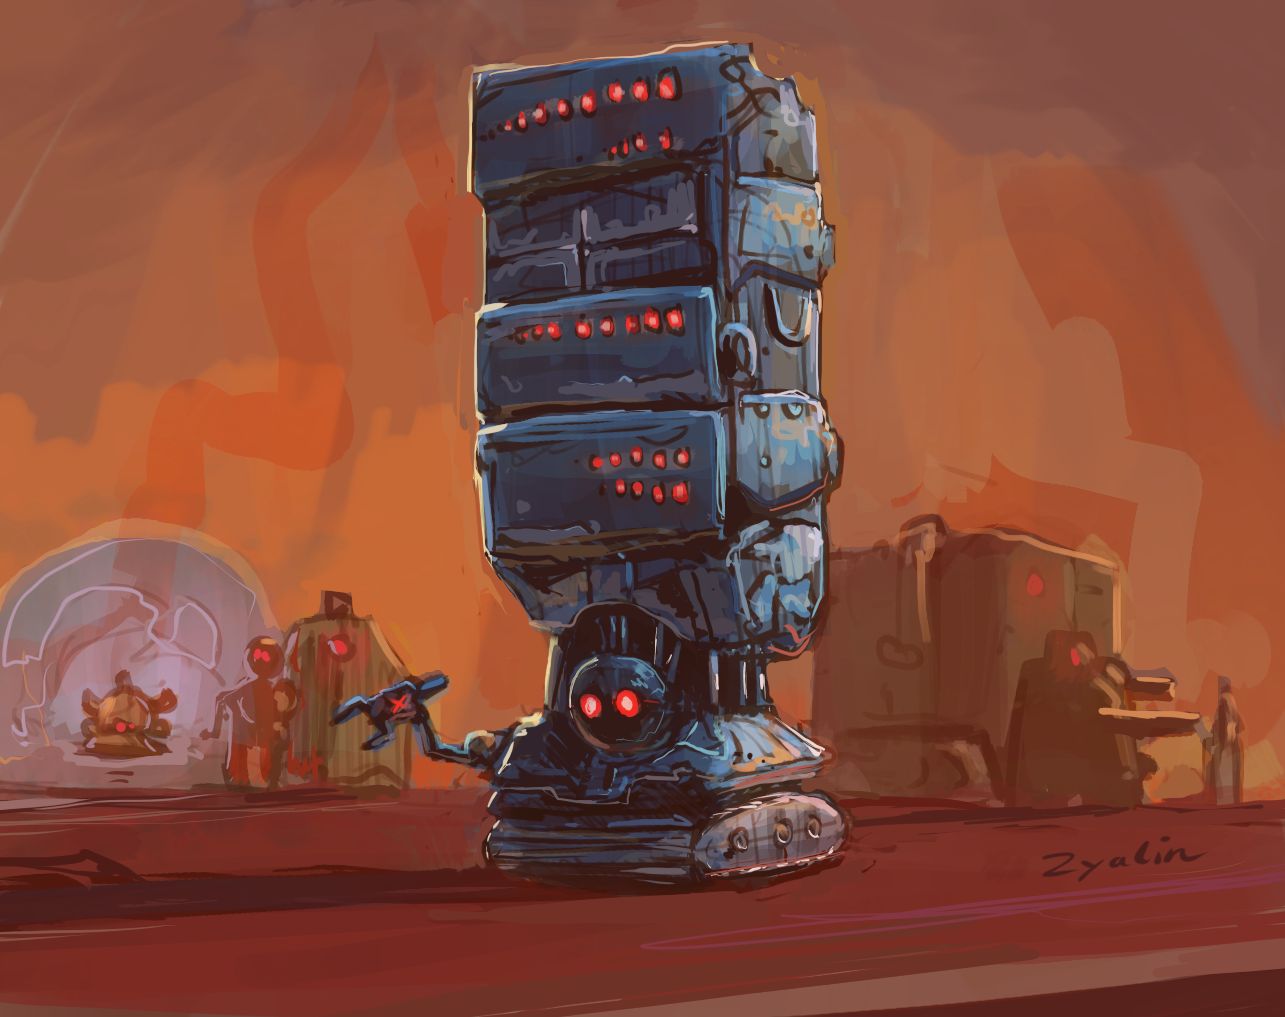
Even the derelicts know good legs when they see them (art by Zyalin).
As a bonus, players using legs to kick other bots out of the way also never take damage from the attempt. Earlier this required at least five legs for safety to be guaranteed, but that alone would never be reason enough for people to go with legs, and couldn’t even matter until relatively late in the game anyway.
Now we’ll definitely have some players opting to run non-overweight leg builds to complement their strategies. “Non-overweight” because the evasion bonus from running does not apply in that case ;). That said, I think we’ll see an even greater proportion of players trying to keep their builds underweight than before, anyway, due to other Beta 11 changes…
Overweight Penalties
Early in Beta 11 development there was an attempt to completely rethink Cogmind’s overweight mechanics, in particular the way exceeding a build’s mass support interacts with movement speed.
The basic idea was to switch from the original system of thresholds defined by how many multiples of a build’s mass support had been exceeded to instead find some kind of formula that would enable a more granular approach so that exceeding a threshold wouldn’t immediately have such a large impact on speed, and heavier builds on legs and treads would actually get progressively slower as they piled on more and more mass beyond their initial threshold.
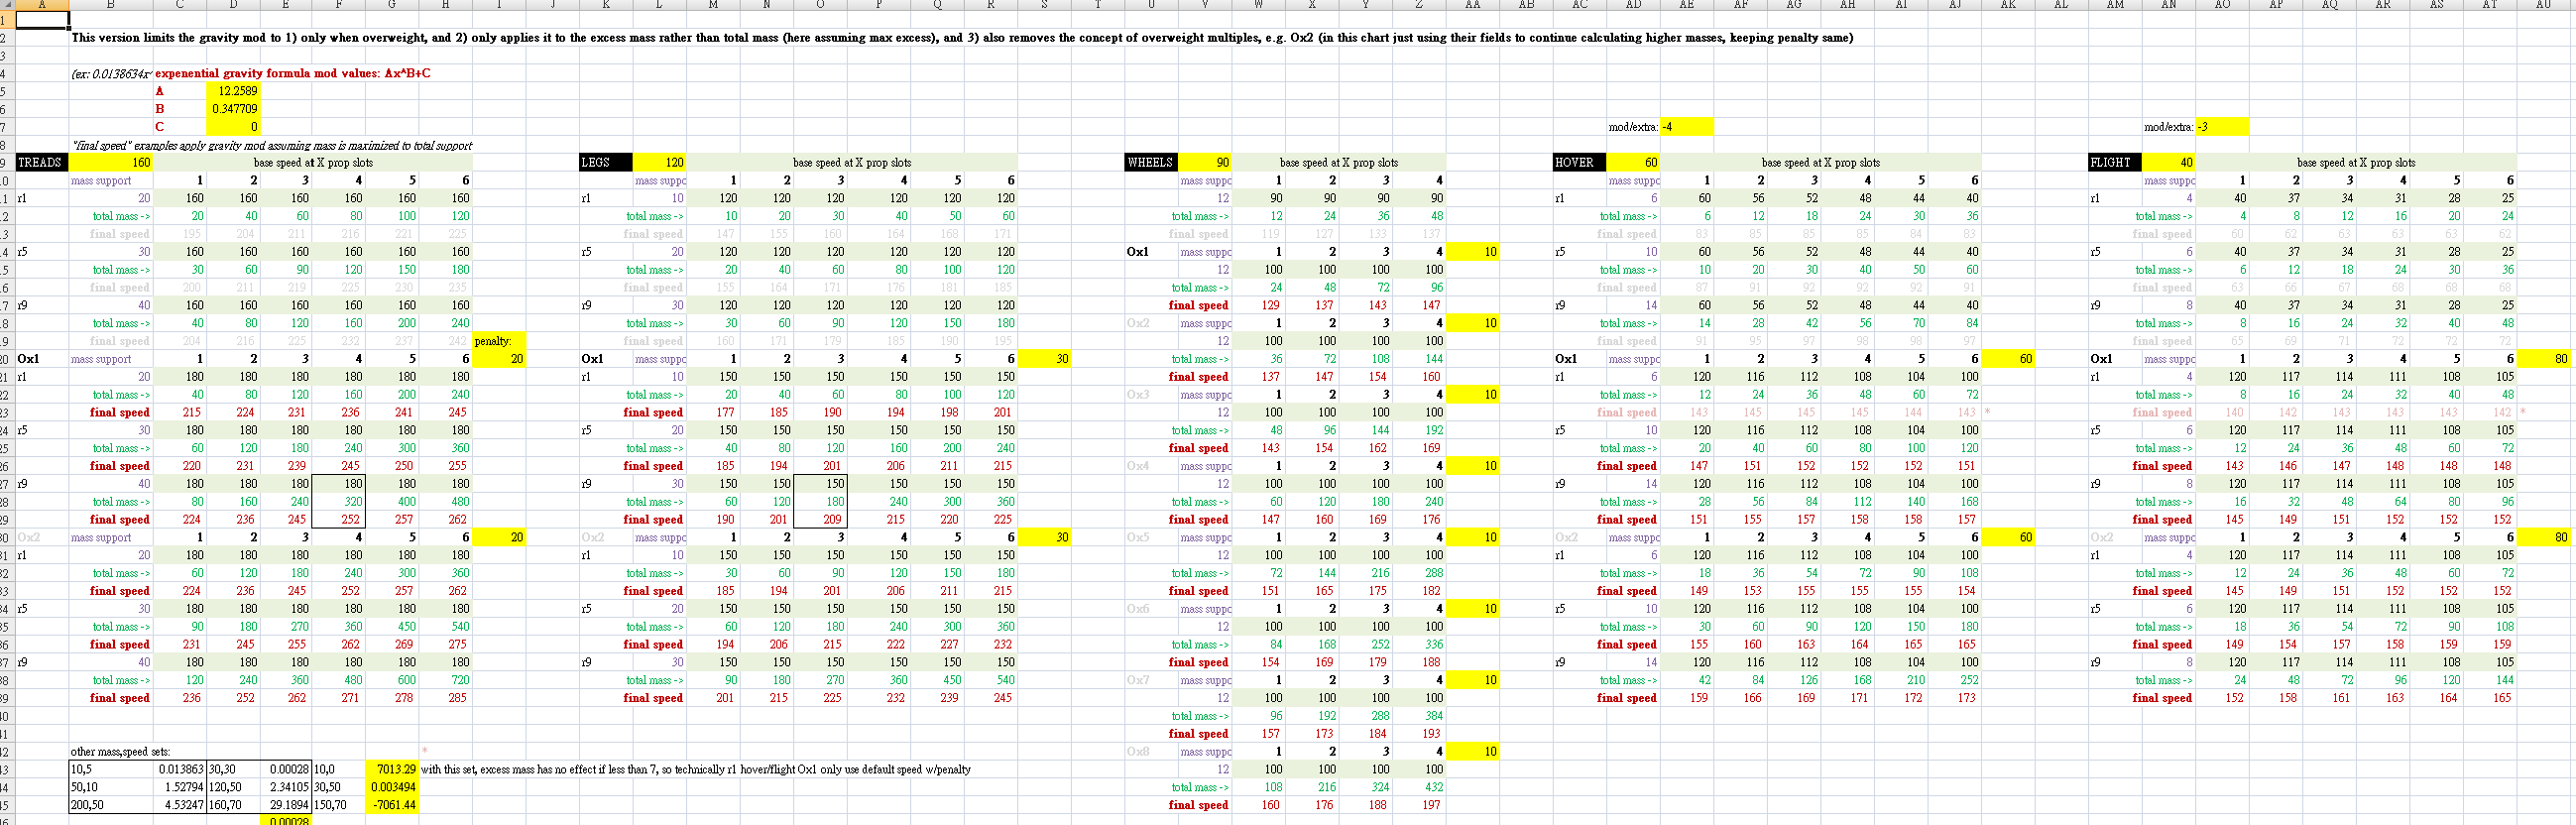
Because on top of having five different prop types there are also so many potential combinations of slot counts and mass levels, even before building this new system I had to put together a ton of spreadsheets to test out reasonable values and formulas.
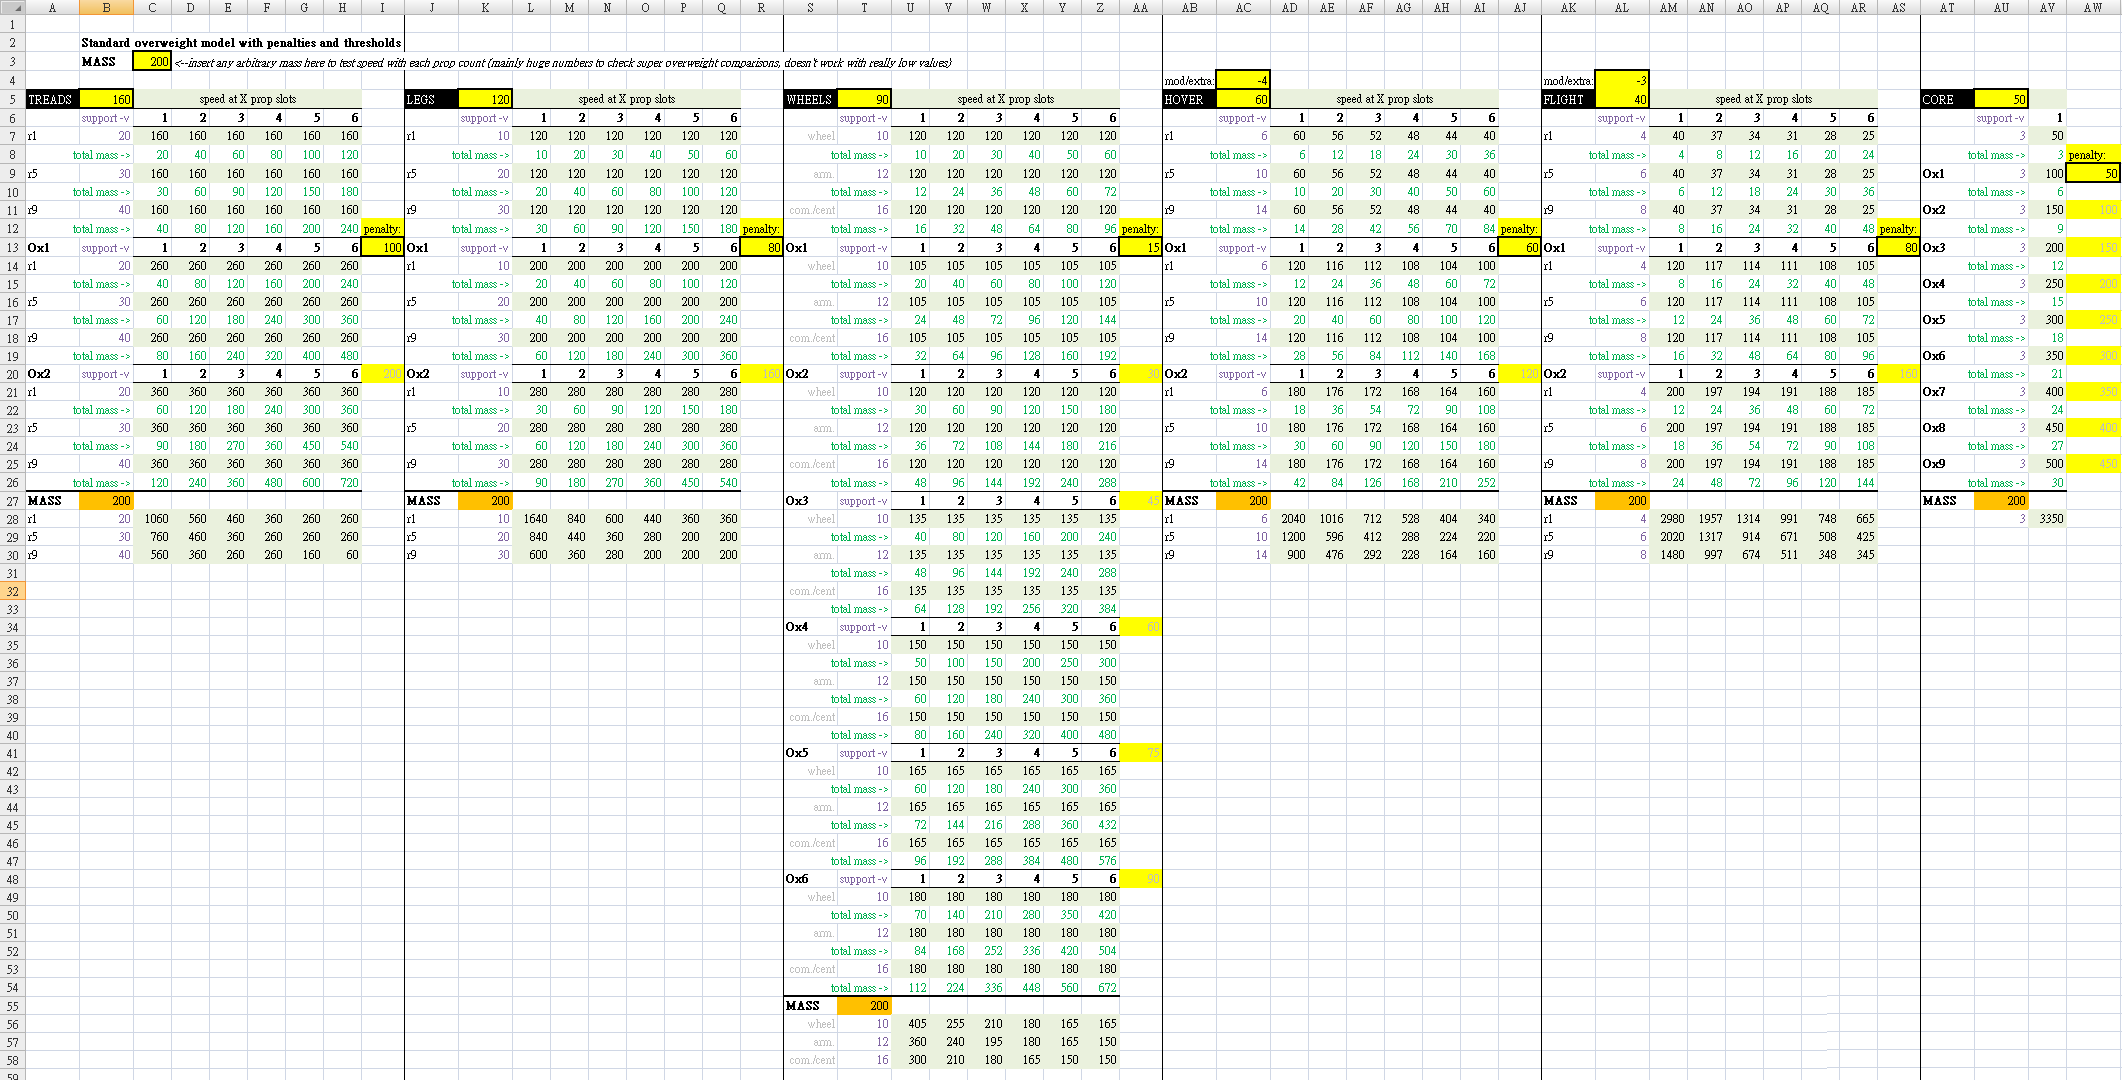
One of the early spreadsheets set up to easily see the effects of tweaking a set of core overweight values (open for full size).
Even with the spreadsheets it wasn’t easy to find an approach that would work without breaking everything, and at first I settled on a solution (depicted above, if you can decipher the chart…) that applies a single speed penalty on going overweight, as before, but after that includes a further speed reduction based on the amount of mass by which you exceed the threshold, rather than waiting to reach other thresholds.
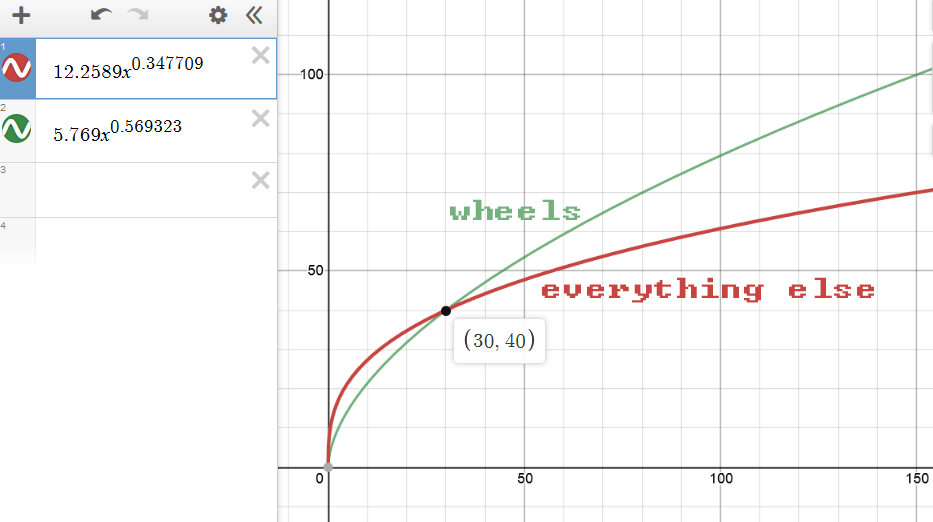
The mass-speed relationship there was not linear, however, instead following an inverted exponential curve so that the effect is more pronounced earlier on and it gradually tapers off as a build’s mass grows. Although actually the opposite of what one might imagine should happen in reality, the point after all is to balance a game and in this case keep speeds within reason while still allowing for very heavy builds.
Sample overweight curves for speed mods over excess mass.
Multiple iterations were tested, including a single overweight formula, and a separate formula for wheels so they could retain their unique overweight interaction, and strong consideration was given to even having formulas specific to each class of propulsion.
Well none of it quite worked :P
There were too many oddities or ways to take advantage of the mechanics (or builds broken by the changes), not all that surprising considering the entire game was designed around the original system devised in 2012, which I’ve always actually liked a fair bit for its simplicity and consistency. Compared to using formulas, clear thresholds are easier for players to grasp and work with.
In the end it’s again kinda funny because this big system change was actually a sort of overreaction to what triggered attention to this mechanic in the first place: mass no longer mattering as a factor to treads and legs once they exceeded the first threshold. This experiment was mainly answering the call of numerous players inquiring about a potential granular overweight system, so I thought we’d try it out for a bit. Too bad it turns out “experimenting with it for a bit” actually took a huge amount of time, both because it was a complicated undertaking and because repeated attempts all failed xD
So the final overweight changes in Beta 11 actually end up being a lot more tame and targeted, more or less keeping the original system, but with significantly greater threshold penalties for overweight legs and treads :P
The final spreadsheet calculating speed modifiers based on Cogmind’s standard overweight threshold system (open for full size).
Overall due to the <no_stack> changes (and leg upgrades discussed earlier) I think more builds will start to lean towards being underweight anyway, either because they have more prop slots to play with (due to freeing up storage slots) or simply less mass support devoted to heavy Storage Units (since storage was usually the heaviest component of most builds).
Mass Support Utilities
A discussion of overweight propulsion and mass support isn’t quite complete without talking about the group of utilities that enable builds to increase their support threshold for a resource cost by allocating utility slots instead of just prop slots. Weight Redistribution Systems and their much more efficient high-rating kin are one of the main alternative ways especially faster builds could avoid going overweight (but without increasing speed which extra airborne prop would help with).
These have always been extremely problematic to balance against the normal propulsion mechanics--it’s pretty much impossible, in fact, given the nature of the systems involved, so despite multiple attempts to rework them throughout Cogmind’s history, it was finally about time to simply remove them…
However, players made some strong arguments for at least keeping them around in a no_stack capacity, which as discussed in the previous article is something I try to avoid whenever possible, but I do rather like the ability of mass support utilities to add a bit of flexibility to a build’s mass support via a utility slot (plus some of the other robot designs utilities these parts!), so we’ll go with that for now.
Sadly, gone are the days of powerful 2-slot flight builds.
For posterity, here’s Valguris’ final 2-slot flight build from one of his Beta 8 double extended wins, as recorded in his scoresheet (see the full scoresheet here). It sports three mass support utilities among other crazy good parts. (Some item names might be minor spoilers.)
Part 3, now available, looks at further differentiating weapons with a wide variety of critical strikes, and other new related mechanics.
Cogmind’s next update (Beta 11) is taking years of play experience, feedback, and observations into consideration for a comprehensive review of the many items and their stats with an eye towards readjusting a variety of aspects to create an even more balanced and fun game full of interesting decisions and trade offs. A number of values need to be reevaluated in the light of all the changes and (especially) tons of additions that have been made in the years since 2012.
While many of the early design decisions established a good foundation that in a general sense has withstood the test of time by both attracting and holding the interest of many long-time players, and along the way the integration of new mechanics and content expansions certainly resulted in a number of retroactive adjustments to prior work to keep things more or less balanced, there’s never been a much wider review of the kind we’ve wanted to do since like… five years ago xD
Especially with regard to less vital parts of the game, there’s been an understanding in the community that one day they could one day all be addressed together as part of the “Great Utility Update” (so called because Cogmind’s largest category of items and many of those frequently discussed in balance/usefulness terms happen to be utilities), so lots of these kinds of things have piled up over the years.
With Cogmind basically done and preparing to embark on expansions definitely outside the realm of what was originally planned (see the 2020 ARG :P), Beta 11 is finally the time to do this big review.
But we’re not starting with the little stuff! On the contrary, if there are any significant balance changes to be made, those need to happen first, and it just so happens that some of these are indeed coming down the pipeline, somewhat unexpectedly, even…
Capping Inventory Capacity
One of the more fundamental design levers when it comes to utilities is whether or not their effect stacks when attaching multiple of the same type. Storage Units have always been stackable, meaning players who want to carry around even more spare parts (and don’t mind being overweight, because storage is heavy!) could just load up on extra Storage Units and fill them with salvage and looted parts. Among the better players, over time this feature clearly led to rampant inventory inflation, and we saw more and more superheavy storage-laden builds working their way through most of the game like that until they’d shed most or all of their storage and use the contents to assemble their ultimate build for the final stretch/extended game. Basically the safest play tended to be maximize inventory size for as long as possible, whatever players thought they could get away with depending on their build goals and how dangerous their chosen route might be along the way.
Zyalin‘s depiction of a storage-laden Cogmind build (in particular a bothacking RIF build, a topic we’ll get to later).
This whole approach is actually kinda anti-Cogmind, circumventing much of the “dynamically adapt to circumstances” aspect while being a significant drag on the build effectiveness and the experience in general (due to generally slower builds and more utility slots allocated to increasing storage capacity because spare parts are so valuable compared to using the slot for one other active part).
Either avoid most confrontations, or suffer from higher than average part attrition due to reduced effectiveness both in and out of combat while constantly cycling through replacement parts instead.
Other drawbacks of massive inventory growth start to appear as their size expands further beyond what the interface was designed to handle. The original GUI layout and functionality assumed that builds would generally have one or two pages of inventory content (or at most three), as it can only display up to 12 parts at once and allows interaction with 10 of them (equivalent to the 1~0 number keys). Then of course there are the players frequently running around with 5~6 pages of inventory (10 has happened before, too xD) and it becomes cumbersome to use on top of the weaker build resulting from having so many utility slots devoted to all those Storage Units.
Insane inventory capacity at work in the wild. This particular streamer’s late-game build had a total of 18 utility slots at the time, 10 of which were occupied by storage units xD (not to mention the focus on evolving utility slots meant having evolved nothing else).
Players being inventive and challenging themselves to work their way outside the bounds of a game’s design can be interesting, but less so if it’s a very easily triggered compulsive behavior like hoarding.
That’s not to say the goal here is to completely remove the potential for superheavy hauler builds--even in Beta 11 fairly large inventories will still be possible, but some kind of limitations would really help here and I believe 1) we do still need to tweak the cost-benefit equation when it comes to carrying an almost endless supply of parts, and 2) this can be done in a way that also keeps the game more fun by freeing up more utility slots for other purposes.
At the same time, I’m grateful for the period over which players did put a lot of pressure on the inventory management interface because it gave us QoL enhancements like swap functionality :)
Demonstrating two of the many ways to swap parts in Cogmind.
So with a general consensus in the community that inventory capacities were getting out of hand, naturally the next step is to figure out what to do about it…
<no_stack> Storage Units
In the Balance Overhaul discussion thread on the forums, zxc repeated his outlandish suggestion to go with <no_stack> storage (referring to the in-game tag used to mark utilities that cannot be stacked). One might think that too extreme a change, and I was definitely in this camp from the beginning. For one I prefer to avoid no_stack whenever possible since it’s a very hard limitation, and that can mean somewhat less flexibility in terms of build variety, especially worrisome in this case due to how central the storage capacity element is to a build--to me the the ability to mix and match different types of Storage Units (or multiples of a certain type) to get just the right balance of mass and capacity seemed really important. But it can also be easy to overlook the fact that limitations in one area open up more opportunities elsewhere, particularly in this case as we get even more utility options (like the latest infowar set!).
A range of less extreme alternatives were proposed by other players, but I decided we could try some truly experimental patron builds featuring behaviors which might not actually make it into the official release, and if we’re going experimental, might as well go extreme to begin with and see how that feels before possibly dialing it back or examining other options in more detail.
Numbers
Taken in isolation, simply slapping no_stack behavior onto Storage Units does indeed seem way too radical and likely to both weaken many builds, but compensating with much greater capacity from a single unit as well as adding extra types to choose from resolves these issues nicely.
The main question here is of course what kind of inventory sizes are we targeting?
Somewhere around an inventory size of 20~25 seems reasonable for the average combat build--it’s a size I’m familiar with since I often go with that, and others agreed, so let’s let the Large and High-capacity units straddle that range and extrapolate from there. Altogether this results in only about two pages of inventory items, which is very reasonable to work with, and remember that concentrating this much storage into a single slot also frees up one or two extra utility slots for other uses, helping those existing inventory slots go the extra mile since increased build effectiveness somewhat reduces the need for spares.
Of course some builds might still like to carry more than that, which is fine, so under no_stack rules that would require adding some more options at the higher end which come with pretty hefty costs, namely both significantly higher mass and an additional slot.
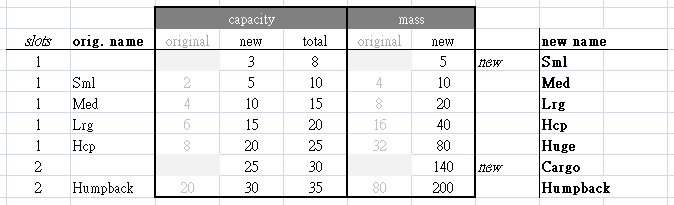
After testing and tweaking, it turns out no_stack storage is a great improvement overall, and the final set is as follows:
Beta 11 Storage Units reworked and expanded for compatibility with no_stack behavior.
As you can see there the naming system was shifted a bit, allowing all existing robot builds to continue using the same type of storage as before, good for both loadout familiarity as well as retaining names that feel more in line with each robot’s purpose as originally designed (mainly the non-combat varieties).
Numberwise, with the main series mass doubles for each linear increase in capacity, which is the same style of progression we had before except instead of focusing on +2 capacity per jump, the new number is +5. And because most builds will attach some type of Storage Unit, but Cogmind’s base inventory size has always been 4, to avoid creating a bunch of awkward inventory sizes like 9, 14, 19, 24 and so on, the base inventory size (the amount of storage with no additional units attached) was increased to 5. This makes any related mental calculations a bit easier.
Overall these changes to mean player power in the early- and mid-game are somewhat higher, but this is fine because it means we can more safely add more challenges there to compensate ;)
Cargo Storage Unit art.
The most common question among players with regard to this type of inventory cap is “what about full RIF builds?!” (maybe sometimes with more exclamation marks? :P) Since we could always adjust the RIF system if necessary, this wasn’t even a concern for me going into the no_stack experiment--wait and see, right? That’s just one secondary system, after all, whereas the goal here was to first modify a core gameplay element. It’s an inevitable question, though, seeing as some RIF builds focus on hoarding a huge supply of spare couplers as their main source of power, and using them in smaller numbers doesn’t require the support of numerous other parts so there’s plenty of room for storage utilities.
Once no_stack was implemented I did a full RIF run to test it out, as well as listened to feedback from patrons doing the same, and surprisingly even without any other changes it was actually a better experience! Despite a reduction in total inventory capacity, without the excessive amount of storage myself and others might choose to attach, there was plenty more room for active Relay Couplers, couplers which 1) don’t need to occupy inventory space anyway and 2) can help deal with threats (especially when combined with RIF abilities, many of which rely on having a relevant active coupler in the first place). Plus of course optional room for other non-coupler parts, too, such as infowar, armor, or whatever you need…
More active couplers = more fun :D
The full run is archived on YouTube:
(Also remember this is just relevant to “full RIF” builds, whereas there are alternate RIF strategies that use only one or two types of couplers, or even none.)
Players will notice that the Lightpack unique item is not included in the storage chart above; this is because it will be balanced differently given its special origin. And there is also room for additional unique storage types, in fact even more so given that they’re no longer stackable, since the knowledge that they must be used in isolation rather than potentially in combination with other Storage Units makes more interesting designs possible.
As for acquisition, the new Huge type can be found in stockpiles, and while the new Cargo Storage Units are unlikely to be found just lying around, they can still be fabricated from schematics, or taken from from a new type of robot and dispatch coming to Beta 11.
Up next in part 2 is a significant flight and hover rebalance, leg upgrades, overweight penalty changes, and more…
Kyzrati on How to Make a RoguelikeHm, first hit for me in Google (well, second hit if a more general search because the first hit is about the sequel he released...
joeljpa on How to Make a RoguelikeAmazing article. Maybe add the link to the Rock Paper Shotgun article on Armoured Commander? Took a while to find it, .
Kyzrati on Year 12 of the CogmindThat's pretty interesting, actually! Apprehension at... the beginning? Cogmind is well known among players as a pretty stressful, ...
Bert on Year 12 of the CogmindI always feel a sense of unease or apprehension upon starting a Cogmind run. This is a very good thing as only a handful of...
Kyzrati on Year 12 of the CogmindNice! Glad those are meaningful in yet another way, even better with the latest Beta 16 given there are finally achievements for a...
Kyzrati on Year 12 of the CogmindHehe, saw some of those "most played game" screenshots from regular players, some of them surprised, some certainly not :P Your su...

")
")


")